Ever since Microsoft’s Virtual PC 2004 (VPC) was released, I’ve been using it for development tasks… specifically SharePoint related projects since it requires Windows 2003 and all my desktops have WinXP Pro installed. I also used a VPC for all my work my recent book (running MCMS and SharePoint require some specific configurations). If you’ve used it and you’re a SharePoint developer, or someone who works with server software quite a bit, you probably share my experiences and opinions related to management and installations. Recently I elected to not install any development applications (Visual Studio, SQL Server, testing apps & utilities, etc) on my primary desktop at home after a fresh build of the entire machine. Instead, I decided I’d move all of my development to a VPC environment. Why? Seems that my desktop @ home gets so cluttered with different apps and more and more freeware/shareware/beta/alpha development utilities that eventually, it hoses up and warrants a rebuild, something I hate doing and clearly doesn’t pass the SAF (spousal acceptance factor). In moving all development to VPCs, I’m hoping to eliminate/reduce the need for rebuilds that seem to be required every 6-12 months or so.
The most significant issue with VPCs is the hardware requirements to make your experience not feel like you’re in a virtual environment. My machine at home is a P4 2.2Ghz w/ Hyper Threading tech, 2GB RAM, and a 30GB drive for OS/apps and a 300GB drive for data. All my VPCs reside in a single folder on my data drive. This config is plenty to make my VPC experience as close to a real PC experience (i.e.: working directly on your host OS). I don’t think my situation is that far from what many developers experience (except for you independents): (1) I have a work laptop and a desktop @ home, (2) when I’m home, I don’t want to pull my laptop out, much less use my work laptop for personal projects, (3) I don’t want to run Windows 2003 Server as my primary OS, I prefer WinXP Pro.
I realized I needed a plan: how to best arrange & configure my VPCs to facilitate the following:
- Must be very easy & fast to run-up a new VPC
- Must be space friendly for management, portability, and backup
Right off the bat, a post by Roy Osherove pointed me in the right direction: How to use Virtual PC and still save lots of room: differencing disks. The concept is similar to backup strategies. What you are doing is creating a “base” VPC and install the most common things that you’ll use in almost all situations. Then after prep’ing it, you create a new virtual hard drive (*.VHD file), mark it as a differencing disk, and continue installing additional apps onto this disk. The differencing disk contains the “different” part between the two VHD files. So what have you gained?
- Drive space: if you have have two VPC’s that each take up 7GB, you’re consuming 14GB (I
reallyhope you didn’t just learn something). But if you have a base disk that is 3GB, containing the core of all your VPCs, and two differencing disks, each taking up 4GB, you’re now only consuming 11GB. Sure, this may only be a 23% increase in disk space, but consider that this is only two VPCs. Factor in 3 VPCs, and you’re now saving 7GB or 33%. The more VPCs, the more space you save, but obviously the law of diminishing returns is in full effect. - Speed of running up a new VPC: if you created every VPC from scratch, you’d have to go through the OS install, not to mention hotfixes and extra components (like a web server, directory service, etc) as well as any core applications every single time you need a new VPC. I’ve left out that installing an OS in a VPC (before you install the Virtual Machine Additions) is a SLOW process… much slower than on a physical machine. But, if you used differencing disks, you only have to build your OS with the core components, service packs, hotfixes, and core applications one time. Then, when you needed a new VPC, create a new differencing disk, get the latest OS hotfixes, install the apps you need that aren’t on your base, and you’re hitting the ground running much faster than having to install a new OS.
So… How do I configure my Virtual PC’s?
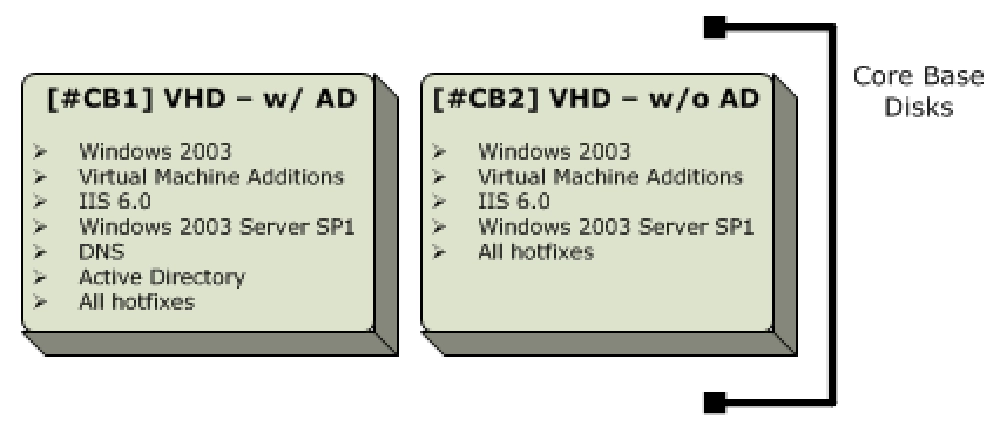
I’m using differencing disks at a slightly higher level. I have have two “core base” VHD files. I created a VPC (using a dynamic VHD file) and installed the following:
- Windows 2003 Server
- Virtual Machine Additions - either select Install Virtual Machine Additions from the VPC menu in a running VPC or map a virtual CD drive to the following ISO (assuming a default install directory): C:\Program Files\Microsoft Virtual PC\Virtual Machine Additions\VMAdditions.iso
- IIS 6.0
- Windows 2003 Server SP1
- All available hotfixes (from Microsoft Update, not Windows Update… this is so future updates will not just check the OS but also all installed apps like Microsoft Office)
Now, I created a copy of this VPC… literally an exact copy. “Dude, weren’t you just talking about differencing disks?” Yes, if you caught it before the list above, I said that I have 2 core base VHD files. I’ve just listed how I create one. However, I also create a core base image that has Active Directory and DNS installed. Why have a core base image without AD? Because I’ve come across two installs where I couldn’t install onto a domain controller and frankly, one thing I hate (other than realizing I forgot to clean my coffee pot the night before) is installing an OS because you can’t do a damn thing for almost 30-45 minutes on that machine. So once I make that copy, I then go through the AD creation wizard in Windows 2003 which also installs DNS for me.
At this point I have two core base VHDs that I’ll use as the base for all my future VPCs. Before I start creating differencing disks, I want to optimize these two images.
- First, run the Windows Disk Defragmenter to defrag the disk.
- After that completes, all your used files will be in as few fragments as possible, but you’ll still have unused space that’s not really “empty”. What you need to do is “zero-out” all the unused space (you’ll see why in just a moment). To do this, map a CD drive to the following ISO: C:\Program Files\Microsoft Virtual PC\Virtual Machine Additions\Virtual Disk Precompactor.iso.
- Once this is complete, shut down the VPC.
- Now we need to compact the VHD file. This will shrink the VHD by removing any unused space… this is why we just ran the precompactor. If we hadn’t run that, the VHD wouldn’t shrink by much because the compactor would see the “deleted” space as being used… if it’s zero’d out, all the unused space will be removed.
- At this point, you now have a clean, optimized, and small core base virtual hard disk. The last two things I do are delete the VMC file associated with this image and mark the VHD as read-only. Why? First of all, once you create a base VHD, you don’t ever want to change it, never ever ever (why? because if you make changes to it, you will likely break the disks that are based from it… this means if you have to apply a hotfix, you apply it to the differencing disks, not the base disks). If there’s no reason you want to change your VHD, the two things you can do to keep that from happening is (1) remove the VMC file which is the only way you can start a virtual machine and (2) if it’s read-only, it can’t be changed.
I then repeat these steps for my other VHD file. Now I have two optimized VHD files:

Core Base Disks
The primary VHD I’ll use going forward is the one with Active Directory installed as that’s the most common case I’ll need; the non-AD VHD is for special cases so I’ll just leave it alone for now. Now, the next step is for the two most costly installs: a development environment (Visual Studio) and database server (SQL Server). I personally do a lot of SharePoint & MCMS related work. SharePoint is unique to these two requirements as the current version of WSS (SP2) supports the new .NET 2.0 products (VS2005 & SQL2005), but SPS SP2 only supports v1.1 (VS2003 & SQL2000). Because of this, I need two base VHDs: one with the .NET v1.1 products (VS2003 & SQL2000) and another with the .NET 2.0 products (VS2005 & SQL2005).
Open up the Virtual PC Console and launch the Virtual Disk Wizard to create a new disk. When prompted, specify that this should be a “differencing disk” and indicate that the core base VHD containing the OS is the disk that it should be based off of. After the disk is created, create a new virtual machine. When the wizard asks you if you want to create a new disk or use an existing one, select “existing” and point to the disk you just created. Now I install the development environment and database server (plus any additional service packs and hotfixes). Then I repeat this same process for the other VHD. Finally, I prep both VHDs the exact same way I prep’d the OS core base VHD above (defrag, precompact, compact, mark read-only, and delete the VMC file).
Updated: November 17, 2005 (ET)
You can’t compact a differential disk. The only thing you can do to a differential VHD is merge it with it’s base.At this point, I now have two VHDs, each based off the same core base VHD. This gives me a great platform to quickly get a new VPC up and running, complete with a fully patched OS, web server, Active Directory, development environment, and database engine. From here, I’ll run through he same process in creating new VPC’s that I did for creating the two development base VHD’s.
So, say for example I need to run up a new VPC to build ASP.NET 2.0 Web Parts to host within the “Son of the SmartPart” for a WSS site. I create a new VHD differencing disk and point it to the VS2005-SQL2005 base VHD. Then I create a new VMC, using the new VHD differencing disk I just created. Now, All I have to do is install WSS and WSS SP2… up and running within 20 minutes or so (assuming I had nothing created ahead of time).

Two Virtual Machines
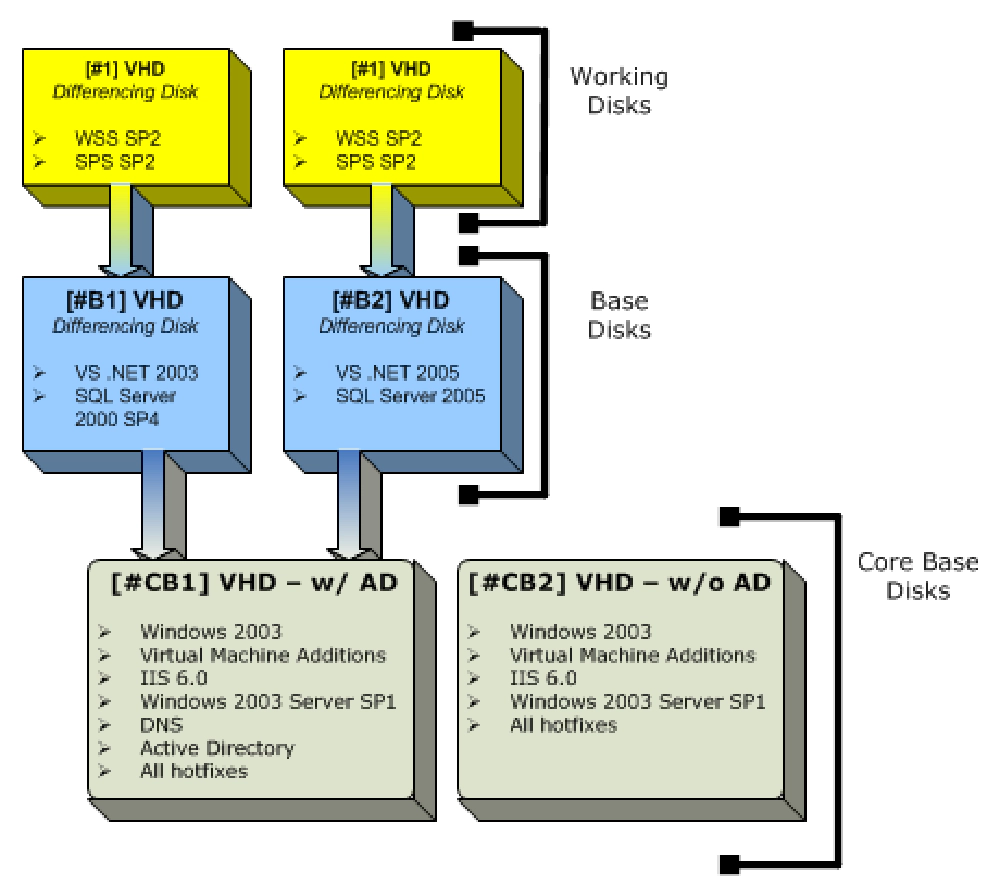
- At the bottom of the diagram to the right you’ll find the two core base images I’ve mentioned. These two virtual hard drive (VHD) files are marked as read only and do not have an associated virtual machine settings file (VMC) associated with them.
- The two blue VHD files are the base disks other VPCs will be based off. They are differencing disks configured to use one of the core base VHD files. For example, in the diagram the differencing disk #B2 is based off the #CB1 core base disk. The only thing installed on the #B2 base disk is a development environment (i.e.: VS .NET 2005) and a database server (i.e.: SQL Server 2005). Once these applications have been installed, these base disks are run through the same optimization process outlined above. These disks (the blue ones) are also marked read only and have no VMC file associated with them.
- The last two VHD’s in this diagram (the two yellow ones at the top) are where you would do your work. In the diagram I show where you could install Windows SharePoint Services & SharePoint Portal Server. This is just an example… it may not make sense to you. Essentially, the “yellow” level in my diagram is where I have my virtual machine settings files and where I do my development or “kick the tires” work.
So what is really happening? When you start a virtual machine, it’s essentially treating all three disks involved in the hierarchy as one physical disk. However, any changes that are happening to the disk (any write I/O’s) will be saved in the yellow disks.
You may look at this and say “damn, aren’t you going a bit too far with this differencing disk deal?”. Maybe, but frankly so far I’ve been running like this for a few months & I haven’t had an issue with performance, regardless of the fact that I have one VHD that’s based off another VHD (the dev+db install) and finally another VHD with the OS. I’m obviously saving space and able to create new VPCs is VERY fast.
There’s one last thing I do. I keep all my projects within [drive]:\Projects, all utilities in [drive]:\Utils, and all development stuff (like CodeSmith, NDoc, Cropper, Reflector, Resourcer templates, snippets, etc) in [drive]:\Development. I use all these in all development environments. So, what I did was create an additional VHD and attach it to each of my VPC’s. I then copied the three afore mentioned directories into this new drive. Now, all machines will share the SAME drive. This is great for sharing projects across environments. It’s also a very easy way to share files across multiple VPCs.

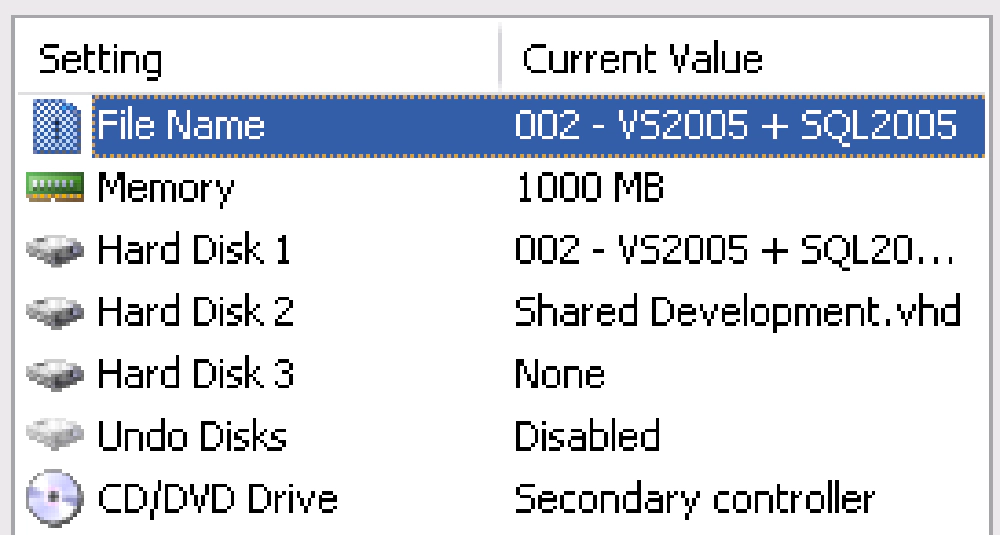
VPC Disk Configuration

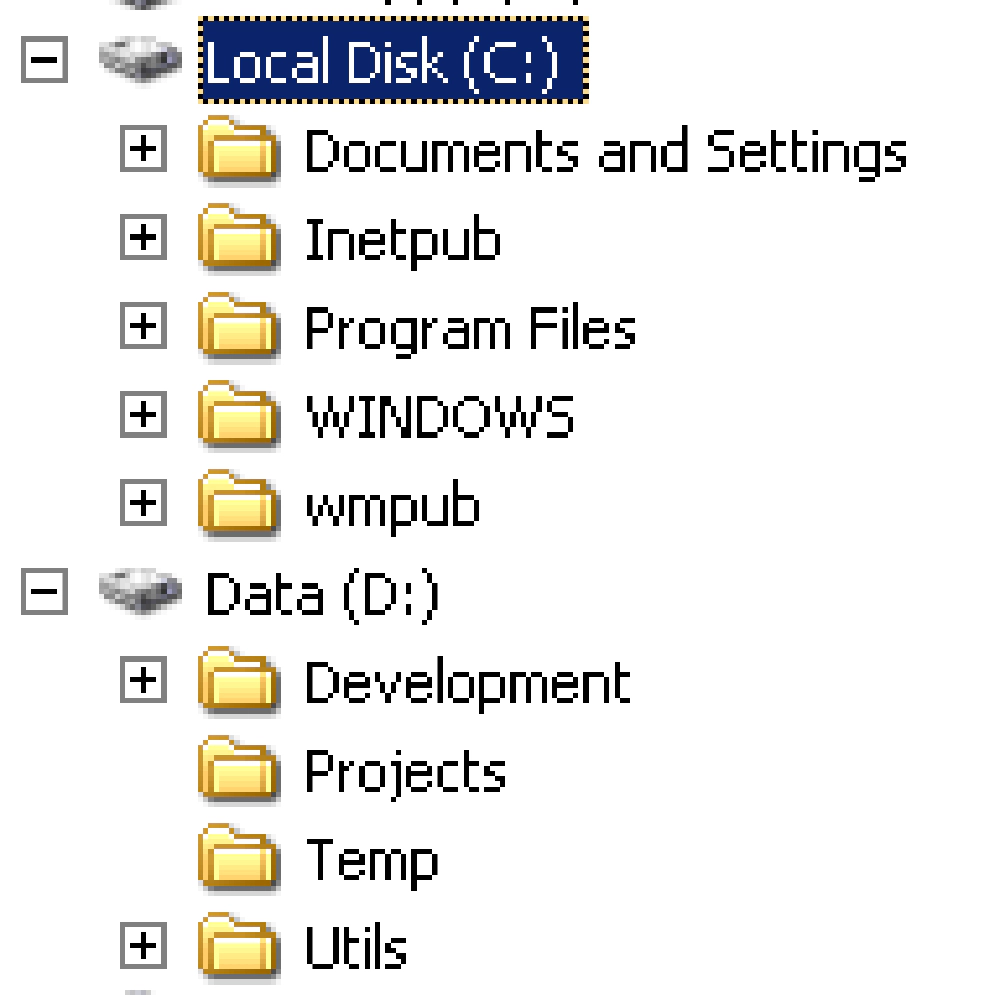
Folder Structure
- The first image above shows the settings file (VMC) for one of my virtual machines. Notice the Hard Disk 2 property is configured to attach the Shared Development.vhd disk to the virtual machine.
- The second image above shows what it looks like when inside the virtual machine
- Other virtual machines would have the same VHD selected for the Hard Disk 2 property.
Benefits to using VPCs:
- Ability to save everything as is via “Save State” option: when you have a VPC loaded, you have the option to stop it and save it’s state. This will write everything in memory to disk. If you’re familiar with the Hibernate option on laptops, this is essentially the same thing. Later, you can start the VPC and it will bring you right back to the state you were in. I’ve even been able to execute a Save State in the midst of a long running install (SQL 2005… I didn’t realize there were two CD’s to download… this was before the DVD’s were available to MSDN Universal Subscribers… so I saved state when it asked for disk 2, ran out and downloaded it, restarted my VPC, mapped to the new ISO, and continue with the install)!
- Undo disk: when starting a VPC, you can elect to enable an undo disk. Think of this as just like a temporary differencing disk. If you have undo disks enabled, when you shut down a VPC it will ask you if you want to (1) delete your changes and thus revert back to the state of a VPC when you started it up (great for testing installations or big configurations that have the potential to break things), (2) save your changes which will just keep the changes in the “Save State” file (*.VSV), or (3) commit you changes to disk which will merge your undo disk changes into your current disk.
- Atomic development: what I mean is that you can make sure your environment is the exact same whenever you work on a project. For example, I wanted to make sure when I was working on the book that I never altered anything with respect to settings or configurations. I needed to make sure that all the steps I was outlining in one of the chapters would work all the time (undo disks were very handy for this as there was no need to undo anything in the VPC).
- Presentations: ever sat in a presentation where the presenter said something along the lines of “I was trying some stuff last night and it blew up my laptop so I’m kinda screwed today?” I have. If your code demos are in a VPC, even if your laptop blows up, you can borrow someone else’s and get up and running right away (assuming you have your slide deck as well).
Extra tips on using VPCs:
The more memory you have, the better. I’ve run full blown developer VPCs with the configs above with only 768MB in the host OS. Personally, I would try to get 2GB on your host OS and dedicate at least half of that to a VPC.
Put all your VPC’s on a separate drive from you OS drive. This reduces contention. The best option IMHO is to get one of those self powered USB 2.5" disks like this one. Spend the extra money for the faster drive (5400 RPM), you’ll notice an improvement if you do. With that being said, I’m running a 3.5" drive that requires external power… but I primarily use it at work so portability wasn’t the biggest factor… honestly the biggest factor was the $10 instant rebate and $40 mail in rebate which made this 80GB 7200RPM drive cost less than $40. Can’t beat that!
Shut off your AntiVirus software: unless you can exclude VHD and VSV files from being monitored by AntiVirus applications, shut it down… it’s just more disk contention that you have to deal with.
Keep the drive where you store your VHD files defragmented.
Keep your VHD files as defragmented as possible: VHD’s are massive… the fewer fragments they are in the faster they’ll run. I use a tool called contig from SysInternals to analyze and defragment a specific file. Here’s what contig looks like:

Console View
Where can you get more info on VirtualPC’s?
- The Soul of a Virtual Machine: Tons of great info
- Virtual PC Guy’s WebLog: Seems to focus a lot on what games will run under VPC, but he also has a good history of VPC tips.
- microsoft.public.virtualpc
Misc
So have I gone crazy with virtualization in as a development environment? Maybe… you can judge for yourself… here’s what my external 80GB USB drive looks like:

Console View
- The blue shaded VHD files are my core base VHD files. The file 002 - AD Base Win2003 SP1 Hard Disk.vhd is the file #CB1 in my diagram above. The file 003 - Base Win2003 SP1.vhd is the file #CB2 in my diagram above.
- The red shaded VHD files are the base VHD’s, or the light-blue boxes in my diagram above. The file 002 - Base VS2005 + SQL2005.vhd is #B2 in the diagram (the other VHD file shaded in red should be obvious what it maps to in my diagram).
- The green shaded VHD files are the disks where I do all my work.
So, if you look at the diagram to the right, you’ll see that the virtual machine 002 - VS2005 + SQL2005.vmc is using the hard disk with the same name: 002 - VS2005 + SQL2005.vhd. That disk is a differencing disk based off the 002 - Base VS2005 + SQL2005.vhd file and that is a differencing disk based off the core base disk 002 - AD Base Win2003 SP1 Hard Disk.vhd.
Notice none of the core base or base VHD files have an associated VMC file and are all marked read-only. As I mentioned above, this will ensure that things don’t change in these base disks.
You may ask “what’s up with the ‘001 *’ files?” Before VS 2005 & SQL 2005 were available, I was putting both VS 2003 & SQL 2000 on my core base image, so I was effectively skipping my “blue layer” in the diagram above. Now I keep my v1.1 & v2.0 environments as separate as possible for a pure testing environment in case I ever need one.