TL;DR
In this post I’ll explain what we consider a good pull request and how we deal with merging them. If you’ve worked with any project that leverages pull requests, you will notice we aren’t doing or saying anything all that unique. However how we merge PRs into our source tree may not look familiar.
Review Common PR Process
Before we get too far, let’s review what the typical contribution process looks like. First, contributors fork the repo to create their own copy. Then they create a branch off the dev branch (the name of the branch does not matter). Contributors then do their work on that branch and when work is complete, they push it to their fork.
Before creating and submitting the PR, you need to make sure your branch has all the commits from the current dev branch in your branch. This is referred to as making sure you are in sync. Why does this matter? Because if you are not in sync when your PR is submitted, there’s a fairly good chance that your contributions could conflict with the code in dev. In our case, if there are conflicts, your PR will be kicked back and you will be asked to fix the conflicts.
How do you sync you branch? Easy… first you need to jump over to the dev branch & make sure it is current with the upstream (the original repo, not your fork… your fork is origin):
git checkout dev
# update your local dev to be a mirror of what's in the main repo
git pull --rebase upstream dev
Now, jump back over to your branch where you are doing you work (we’ll call that feature-branch) & rebase it. What does that mean? Think of it like this. Let’s say you originally created the branch form dev on Monday. It is now Thursday and changes have been going on since Monday. What you are doing when you rebase is effectively saying “act like the start date for feature-branch was really Thursday.”:
git checkout feature-branch
git rebase dev
You may get conflicts or merge conflicts. If you don’t, hey all good. But maybe you get conflicts. These are good to find before submitting the PR because if you didn’t do this, you’d get the shame of the rest of the contributors for having your PR kicked back because of conflicts found when merging. OK, just kidding… but wouldn’t you want to deal with them first?
Don’t - Single Commit Closes Multiple Issues (Single Responsibility Commits)
I said a similar thing in the last post about commits where each commit should have single responsibility. This is one rule we don’t budge on - a single commit should only close a single issue, not multiple issues. The only exception is if one issue stems from other issues like there’s some cascading regression. But that’s rare in my experience.
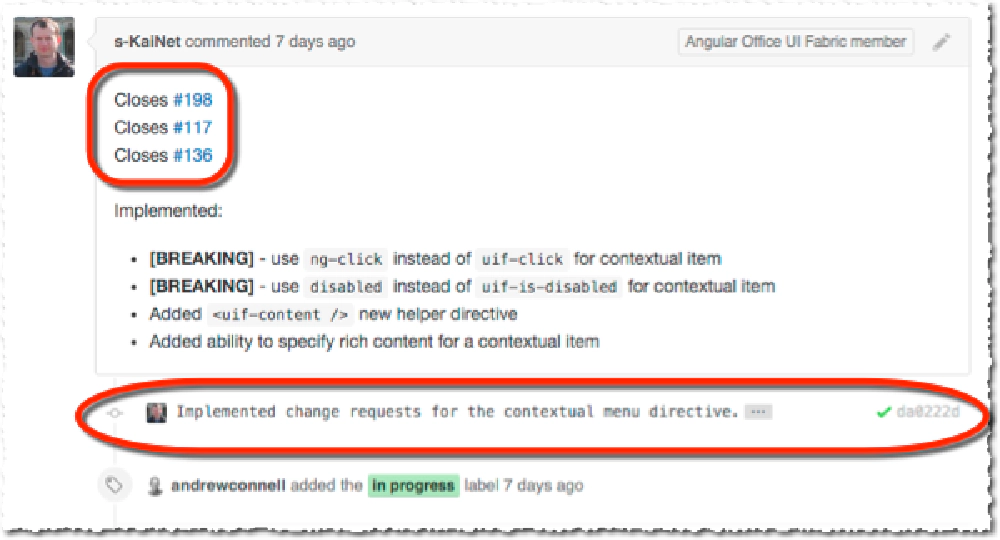
If a contributor submits a PR that includes a commit that closes multiple issues, we insist that the commit is broken up into separate commits that address each item. Take a look at this PR: https://github.com/ngOfficeUIFabric/ng-officeuifabric/pull/201.

Example Pull Request
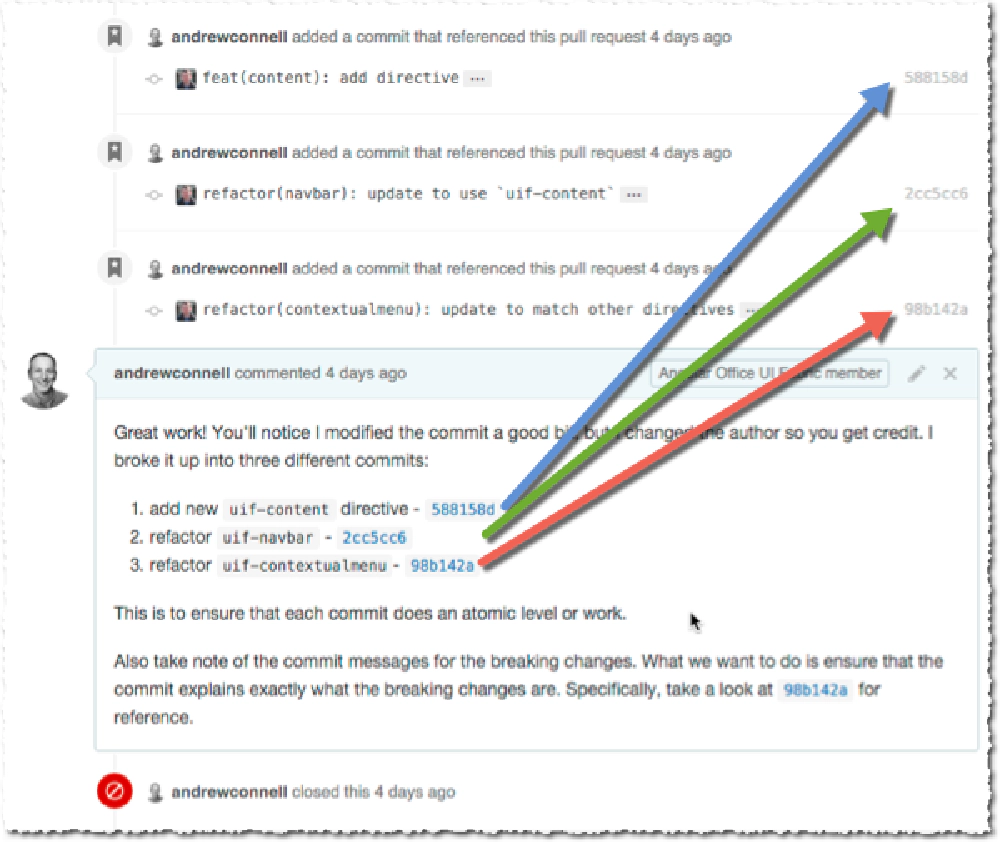
As you can see from the screenshot it closed three issues as it did three things (add a new directive and refactor two other directives) but there’s only a single commit. This is not what we want… instead what I did was break up the commit, create three separate commits for each action taken and reference the appropriate issues:

Broken up commits
Breaking up a commit is actually pretty easy. This is effectively you saying “undo the last commit action, but don’t change the code, just act like the commit never happened”… think of it as a commit is a glass jar containing a bunch of commits. You are breaking the glass jar and left with it’s contents you need to repackage.
If it’s the most recent commit you want to address (which if you follow the process I outline blow in the section “Merge PR’s Manually” it should be because you isolate the PR from other code in it’s own branch) you simply break the most recent thing on your HEAD:
git reset HEAD~1
Now you are left with all the files that were in the commit with changes applied. You can see this by running git status. At this point you selectively.
If you need to go further back in the tree, then you can do something like git rebase -i HEAD~3 where 3 is how many commits back it is. In the interactive session you find the commit you want to break up and change it from pick to edit, save & exit. Now the rebase will stop just after the commit you want to edit so now you run git reset HEAD~. Repeat the process above in committing each file(s) and adding the correct message. When finished, continue with the rebase (git rebase --continue) which will take you back to your branch (if it doesn’t you have additional cleanup work to do, but following these steps you should not have any).
This last step is a matter of preference… but since you break the commit and create new commits, you will be the author, not the original contributor. I don’t like this so I rewrite history which is something I explained in my last post, making sure the original contributor is listed as the author on the new commits. You can see how this gets manifested in the log from this commit: 98b142a2:

Shared Attribution
Ideal - One PR Per Issue Closed
Now, it’s ideal to have a single PR address a single issue so that means that it would have a single commit in it. This isn’t a hard and fast rule we enforce… it’s more of a preference.
A PR should at least address related issues… it should not include a bunch of unrelated issues. But if it closes two or three related issues, as long as each issue is tied to a specific commit in the PR, it’s acceptable.
Clear Title & Description with Referenced Closing Issue(s)
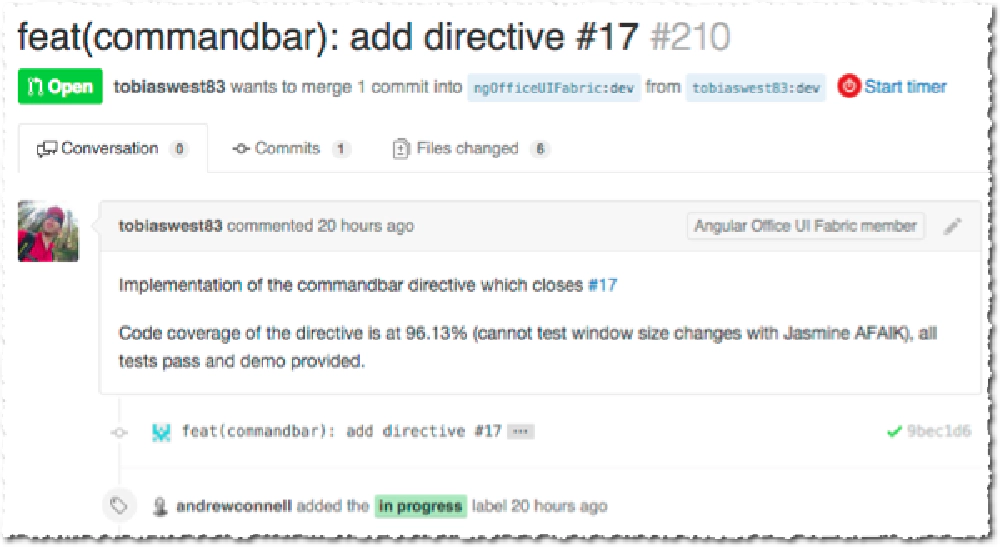
Do I really need to explain this? Make it clear what’s going on so the person merging can get in your head and understand the context. A good example of this can be seen in PR210. You can see it closes issue 17, what it’s actually doing and some extra stuff.

Commits that close issues
I recommend using GitHub’s new support for PR templates too: https://help.github.com/articles/creating-a-pull-request-template-for-your-repository
Merge PR’s Manually
And for the grand finale, how do we merge PR’s? It’s not as simple as pressing that green button in GitHub!!!

Manually merging PRs
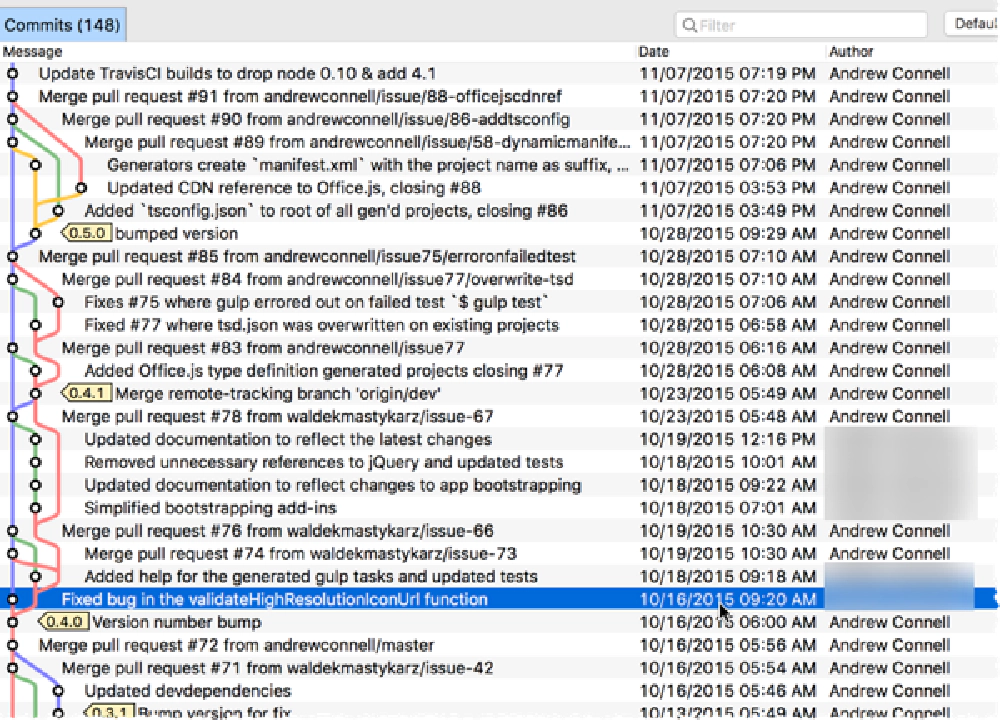
Why? Because that generates merge commits… you’ve seen those in my last post… they don’t do a damn bit of good except make a horribly dirty & unusable commit log!

Merge commits dirty up the commit history
So what do we do to avoid this? Admittedly I lifted this process from the Angular Material team… you’ll see our docs on the process are very similar but I’ll outline it here with some more explanation.
Let me first explain it from a high level, then dig deeper. From a high level, the process works like this:
- create local branch & pull in the PR changes
- run all automated checks (tests, vetting, compilation, etc)
- check demo
- address any commit cleanup work
- merge into the main
devbranch
Let’s pick through these things one at a time.
Work Local
The 2nd biggest complaint I have with GitHub’s big enticing green merge button is that all the work happens on your hosted repo. To me, that thing should be treated like a bank ledger as much as possible - you don’t change it. If you click this button, it makes changes to your main repo in GitHub, not locally where you can verify what you’re doing before you make the change. Merging is a big deal and I want to have a chance to say “whoa… what the hell did I just do” and push the eject button (in other words: delete the local clone, re-clone and start over with what’s in the source of truth: GitHub).
See the link in the image above from GitHub that says command line instructions? That gives you the commands you want which is basically the following (let’s assume I’ve submitted a PR #555 from my forked repo in the branch newfeature-issue12. I’d do the following:
# make sure your dev branch is current
git checkout dev
git pull --rebase origin dev
# create local branch for the PR off the dev branch
git checkout -b pr555 dev
# pull the code in from the contributor's repo & branch
git pull https://github.com/andrewconnell/ng-officeuifabric newfeature-issue12
At this point I now have a branch with the changes in the PR.
Check Everything Meets the Coding Bars
Now here I want to ensure that before I even look at the actual code, it passes all checks. I want to be as clean as possible when I do this and not rely on any legacy stuff.
Because our build process uses Node.js, we use node modules so I blow those away & re-download everything, as well as our built library & clean out previously compiled TypeScript.
rm -rf node_modules
rm -rf dist
# install node modules... time to get coffee here
npm install
# clean out any JavaScript previously built from TypeScript
gulp clean
Next up, we build the project. Since we use TypeScript, the transpilation process will find any errors. Our TypeScript set up uses a tsconfig.json for all settings so we run it using the following:
tsc -p ./
# we actually have this mapped to an npm script so we actually use this:
npm run build:ts
If there were any errors, it’s a coding error so we kick it back as a “build failed” to the contributor and abort the merge. The contributor should not be sending this if build fails so as far as I’m concerned, this one is up to them to fix.
Next, run the tests:
gulp test --verbose
Again, any errors here get kicked back. Bad contributor for submitting a failing test!
Last but not least, I want to see the demo, so we build the library & open the demo in question:
# build library in prod/minified mode
gulp build-lib
# build library in debug mode
gulp build-lib --debug
# ok... I don't run those two commands above...
#   I run this script that calls both of them
npm run build:lib
# open the demo, say for the icon directive
open src/components/icon/demo/index.html
If everything looks good, I consider this one finished!
Check the Commit(s)
I then check the commits to make sure they follow the patters above and in the other post I already published, including breaking them up, squashing them together & making sure they reference closed & referenced issues.
This last piece is important because when the PR is closed, the issues will be automatically closed if referenced correctly in the issues and PR.
Merge the PR changes into the Dev Branch
Last step is to now push the code into the dev branch. Because we created this branch from dev, this part is easy. What we do is simply jump to dev & rebase it on the PR branch. This will add the commits from the PR to the tip of dev without the merge commits!
# jump over to dev
git checkout dev
# rebase dev on the PR
git rebase pr555
# no need for the PR branch now, so delete it
git branch -D pr555
That’s it… push to GitHub and you’re good! I then close the PR and make sure each issue was appropriately closed as well.
Downsides to this Approach
There are two downsides to this manual approach. First GitHub uses the merge commits to indicate the PR was merged in their browser interface. That’s what the purple icon indicates. The red icon indicates the PR was closed. If you use this process I outlined in this post, you’ll only get the red PR close icon. No biggie though… that’s not important.
Second, this might sound like a lot of work? Nah… script it like we do! I have this shell script check-pr.sh that prompts me for the PR number, the contributor’s repo URL and the name of the branch as well as the name of the directive to test. It does all this automatically for me:
#!/bin/bash

# This script is used to automate and speed up the merging of PR's. It prompts for the
#   PR number & source repo+branch at first, then it does the following:
#   1. create a new branch `pr###` from `dev`
#   2. pulls the code from the remote repo+branch into the new local `pr` branch
#   3. removes `node_modules` & `dist` folders
#   4. installs all node modules
#   5. cleans all typescript
#   6. compiles all TypeScript to JavaScript
#   7. vets all code
#   8. runs all tests
#   9. builds library
#   10. launches local demo

echo ""
echo "GETTING A PULL RELEASE AND RUNNING THROUGH THE INITIAL TESTS FOR ANAYLASIS"
echo ""

# jump up to the root of the repo
cd ../..
SRC_PATH=$PWD

# make sure in root of repo
if [ "${SRC_PATH##*/}" != "ng-officeuifabric" ]; then
  echo "ERROR: script must be run from the root of the 'ng-officeuifabric' repo"
  echo "ERROR: you are running from '${SRC_PATH##*/}'"
  exit 1
fi

echo "LOG: current folder: $SRC_PATH"

# prompt for pr# & repo+branch
echo "Please provide the pull release number & the repo+branch where the PR"
echo "  source resides. Get the repo+branch from the PR details, sepecifically the"
echo "  section on the page 'Merging Via Command Line'"
read -p "What PR# is this? (###) " prNum
read -p "Forked repo source of PR? (URL to forked repo) " prForkedRepo
read -p "Forked repo branch of PR? (branch name) " prForkedBranch
read -p "Name of directive to test? (leave blank to skip launching demo) " prDirective

echo ""
echo "Using the following values..."
echo "  pr#:       $prNum"
echo "  repo:      $prForkedRepo"
echo "  branch:    $prForkedBranch"
echo "  directive: $prDirective"
echo ""

# create branch for PR & pull
echo ".. creating new branch & pulling down source in PR"
git checkout dev
git checkout -b pr$prNum
git pull $prForkedRepo $prForkedBranch

# clean up
echo ".. clean out node_modules & build libraries"
rm -rf node_modules
rm -rf dist

# get all modules
echo ".. installing node modules"
npm install

# compile typescript (to run the gulp clean command)
echo ".. compile TypeScript"
npm run build:ts

# clean all typescript (get rid of everything before running a clean build)
echo ".. remove all TypeScript"
gulp clean

# compile typescript
echo ".. recompiling all TypeScript"
npm run build:ts

# vet all code
echo ".. vetting all library TypeScript"
gulp vet-lib-ts --verbose

# run all tests
echo ".. running all tests"
gulp test --verbose

# build library
echo ".. build the library files"
npm run build:lib

# open demo
if [[ -n "${prDirective// }" ]]; then
  echo ".. opening demo"
  open src/components/$prDirective/demo/index.html
else
  echo ".. skipping demo"
fi

echo "FINISHED PR CHECK SCRIPT!"
Closing
Hopefully this gives you some insight and guidance, or maybe you learned something that you can apply to your project. At any rate I wanted a post I could share with contributors to the project so they could see how we did it… hopefully it helps others.
Now onto working on the next post in this series… this one is going to be fun… stay tuned next week!