Nearly two and a half years ago, in March 2013, I relaunched my blog on the OSS CMS platform OrchardCMS. In those two+ years Orchard has had two significant releases (I went live with 1.7.1 but 1.8.2 & 1.9.1 were released with significant performance and functional changes implemented) that I had not applied.
Why? Because I didn’t want to just trip it in apply them on my production multi-tenant Orchard instance in Azure and I had the hardest time getting a reliable development and test instance set up. I wanted to run through the upgrade process and some other modules against a test version of my site before I screwed up my production site.
How do you get over your fear of deploying updates to production? This is where continuos delivery helps you as it forces you to set up a reliable dev / test environment and enables you to ship frequently.
Tools and features have improved a great deal over the last few years that I can take advantage of GitHub and Azure.
TL;DR
The first step was to set up a reliable local development instance of Orchard… one that mirrored my multi-tenant instance in Azure. This involves grabbing some database backups restored and running with a local instance. I then used deployment slots for Azure Wbe Apps to host a staging & development instance of the site in Azure.
Next, the development & staging slots were linked to specific branches in the private GitHub repo where I store the code for the site. When I push changes to either of these branches, GitHub notifies Azure which triggers a pull to get the latest codebase and add it to the respective deployment slot within a few seconds.
Overview & Goals
So what’s the point of all this? It all comes down to the following things for me:
- Make it easier to deploy updates to my multi-tenant OrchardCMS site hosted in Azure Web Apps
- Set up a dev & test environment that lets me work locally and in Azure quickly
This involves doing two things that I outline in this article, such as:
- Set up deployment slots for Azure Web Apps
- Configure select deployment slots for continuous deployment using GitHub
Once those were set up, it’s all a matter of using it! So let me get into it…
My Set up
Throughout this article I’m going to use my set up as the example. This is a real-world set up… it’s how I run the site you’re looking at right now. It’s a multi-tenant OrchardCMS deployment hosting three websites on one codebase.
The three sites are:
andrewconnell.com(this site)- TenantID: Default
- SQL DB: orchardcms-prod
- microsoftcloudshow.com
- TenantID: mscloudshow
- SQL DB: orchardcms-multitenant-prod
- kerrb.com
- TenantID: mscloudshow
- SQL DB: orchardcms-multitenant-prod
I also have a private GitHub repository aci-orchard-prod with two permanent branches master and development. Master always reflects the live site while development is just that… where all my dev comes back. The only thing I keep in my repository is the actual website codebase that I will put in my Azure Web App; I don’t include the entire Orchard source… just what you find in Orchard.Web.
Set up Deployment Slots
todo < staging, dev, s
The first thing to do is to set up deployment slots. Think of these as associated sites to your primary site. They are associated because they can share some characteristics, like app settings, connection strings and also easily be swapped.
The swap feature is one of the coolest parts of deployment slots. What happens is that you can tell Azure that you want the contents & configuration of one slot to be swapped with another. This way you can test a site in a staging slot before you swap it with production.
This article does a great job of explaining how to create deployment slots so I won’t repeat the process here: Set up staging environments for web apps in Azure App Service.
My Deployment Slots
I will share my set up though. My Azure website is named aciorchardcmsprod so it’s URL is http://aciorchardcmsprod.azurewebsites.net. I then have CNAME DNS records for andrewconnell.com, microsoftcloudshow.com and kerrb.com all pointing to this Azure website. Orchard is configured to listen to these specific URLs on each tenant… follow the instructions in Setting up a Multi Tenant Orchard Site to set up Orchard as a multitenant host.
Now let me explain the slots I created, their settings configuration & the purpose of each one. I’ll hold off on the source control configuration of each one for a moment as I’ll explain that in the next section.
Production - http://aciorchardcmsprod.azurewebsites.net
This is the default site that was created when I created the Azure Web App so there’s nothing to create here as you already have it.
I do have a handful of settings in the slot’s Application Settings though. Because I’m using the Microsoft Azure Media Storage module, I need a connection string for each tenant to tell Orchard how to get to my blobs for each tenant. Instead of putting these values in the web.config I put them here so if there are changes, I don’t need to deploy a new file. Each of these have the Slot Setting box checked which means these settings stay with the slot, they aren’t shared across all slots.
Because I’m also using New Relic on my Azure Web App site, I’ve got a few more settings added to follow their documentation. These New Relic settings have the Slot Setting box unchecked as I want them shared across all slots… except the COR_ENABLE_PROFILING setting. That has the Slot Setting checked so I can turn profiling off on some slots by having a dupe of this setting and have it set to 0.
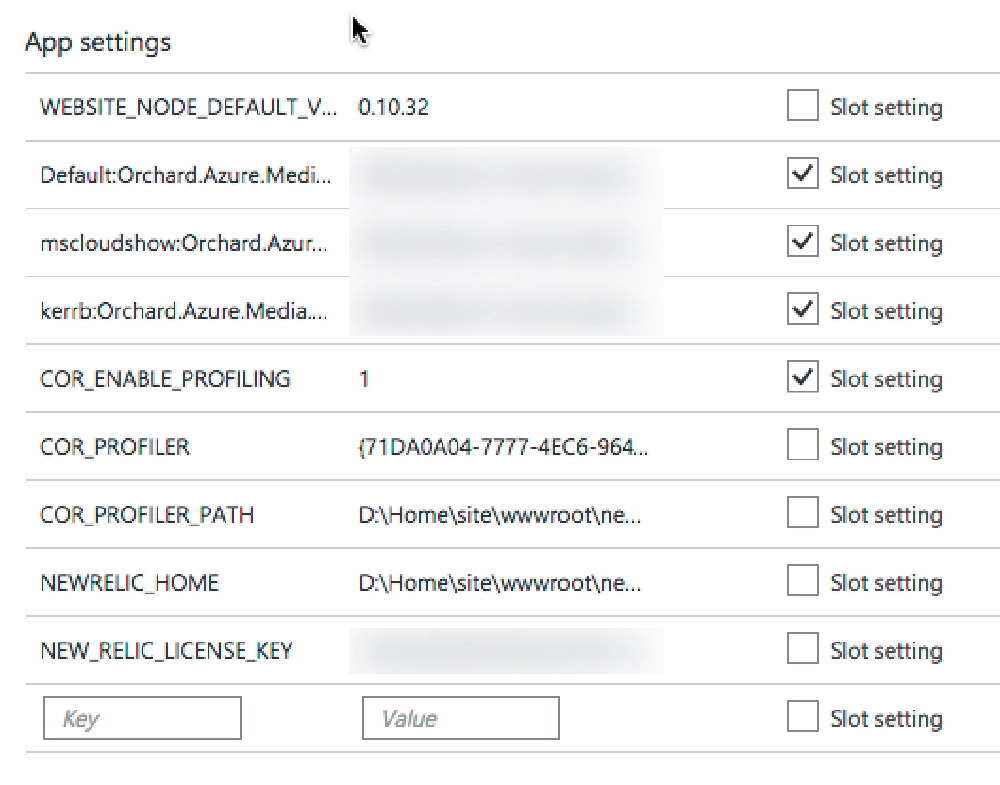
Ochard CMS Production Deployment Slot
I have also added my connection strings to the databases used by my site. These all have the Slot Setting box checked.
Staging - http://aciorchardcmsprod-staging.azurewebsites.net
This slot acts as my pre-production environment. It is set up the exact same way as the production slot except it’s COR_ENABLED_PROFILING app setting is set to 0 so New Relic doesn’t profile this site. It points to the same production databases that production points to. This way I can deploy code or theme updates to the site here and see how things look before making it production.
Once everything looks good, I will swamp this with production.
To keep it clean, I went to each domain’s DNS records and added a CNAME record for staging that points to this site, aciorchardcmsprod-staging.azurewebsites.net. This way I can hit http://staging.andrewconnell.com or http://staging.microsoftcloudshow.com or http://staging.kerrb.com and each Orchard will pick up each tenant.
Dev - http://aciorchardcmsprod-dev.azurewebsites.net
This slot acts as my development / integration environment. It’s set up just like the staging slot except its connection strings point to my development databases that are restored versions of the production databases. This is where I can test out an Orchard update or anything that may have serious impacts on the site and database.
This is where I did my testing to upgrade my site from Orchard v1.7.1 => v1.8.2 => v1.9.1. I found a few bugs in my theme where namespaces changed and was able to fix them before rolling it out to production.
Just like the staging slot, I’ve set up a dev CNAME record pointing to this site for each domain.
Scratch - http://aciorchardcmsprod-scratch.azurewebsites.net
This slot is set up the same way as the development slot. You may wonder why I have this… it will make more sense once I explain the continuous deployment set up in the next section. For now, just think of it as development #2.
One reason I created this was because I don’t live in Windows, I spend most of my day in OSX and as such, I don’t have .NET running where I can test local builds of my OrchardCMS deployment. So I make tweaks using my editor of choice within OSX and manually push straight ot scratch which I treat as my “local development environment in the cloud.”
Just like the staging slot, I’ve set up a scratch CNAME record pointing to this site for each domain.
Configure Continuous Deployment on Deployment Slots
Now for the fun stuff… continuous deployment! I found this to be one of the coolest aspects of deployment slots and using Azure. What this does is it lets you connect a deployment slot to a specific branch in your source control. Once you push your changes to that branch, the source control system you’re using tells Azure that an update just happened. Azure in turn then gets the latest version of the code from your branch and automatically deploys it to the site.
My entire site lives within a private repo in GitHub called aci-orchardcms-prod:
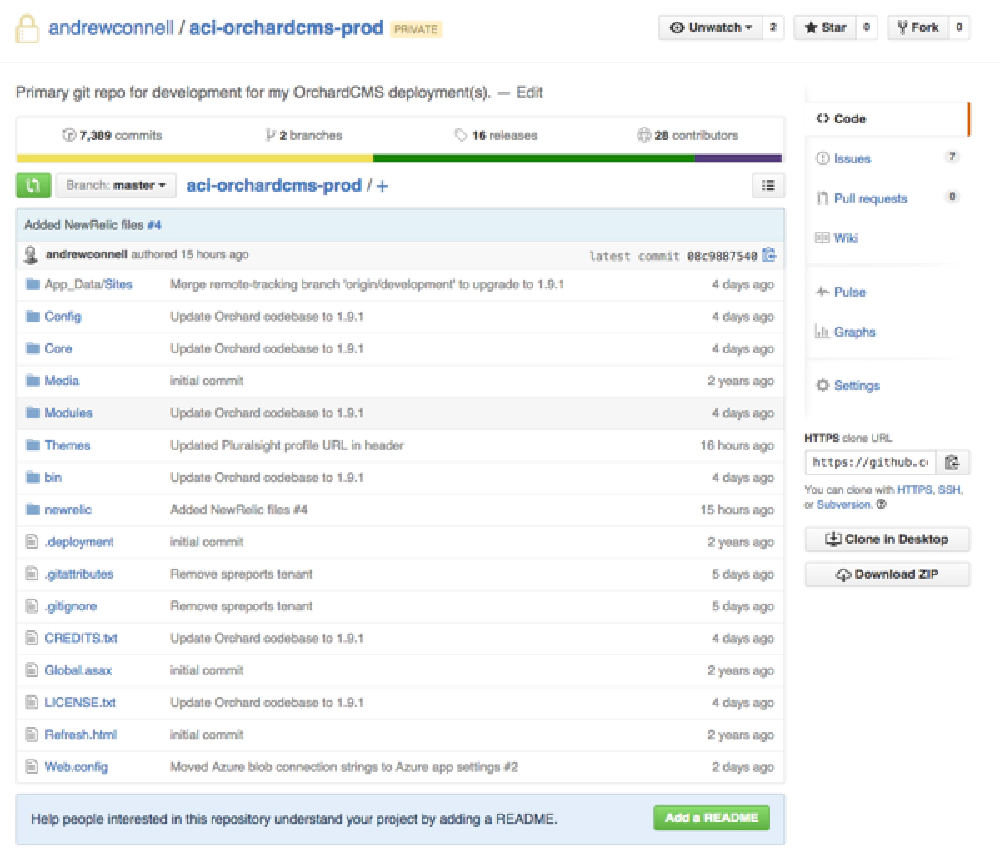
Orchard GitHub Repo
The contents of this repo, as you can see from the above image, is what my website looks like in Azure.
To get this working you need to configure your deployment slots. Now, I only want two of my slots connected to branches in my GitHub repo and configured for automatic & continuous deployment: staging & dev. The other two branches, production & scratch are not going to get automatically updated.
I don’t want to automatically update production, rather I want eyes on the staging environment before I flip it over to production. As for scratch, I want to be able to push code changes to it without having to push them to GitHub first. In effect, scratch is very much like my daily development environment.
Because I’ll never deploy to directly to production, rather it will get updated from staging, there’s nothing to set up. But I do need to have a way to push code to the scratch slot. To do this I’ll set up a local Git repo in that slot so I can push to it.
Set up Local Git Deployment for Scratch
Setting up a local Git repo within a deployment slot is easy. This page, Continuous deployment using GIT in Azure App Service, specifically the section on Enable the web app repository is exactly what you want.
You then need to create a remote in your local cloned repo of your site to point to this new target. Do that by going to the command line and navigating to the folder where your local repo is and adding a remote as follows. I like to name mine something descriptive so I know what it is:
git remote add azure-scatch
https://[email protected]:443/aciorchardcmsprod.git
You need to get the URL for your target from your deployment slot’s configuration. You’ll find this in the essentials section of the site labeled Git Clone Url:
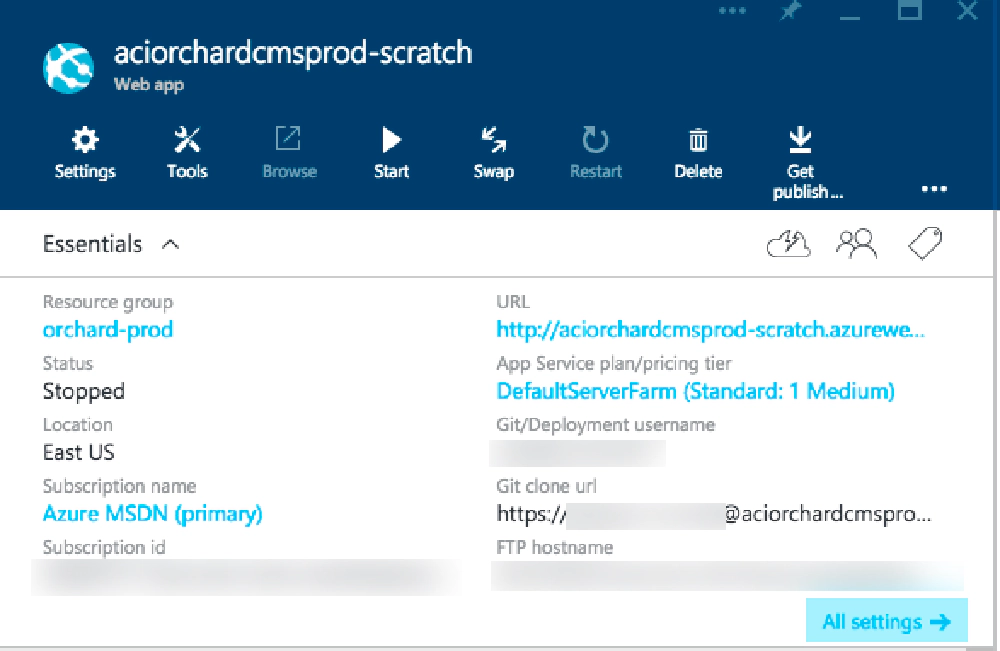
Orchard Staging Essentials
Now I can push directly to that from my laptop using simple Git commands like:
git push azure-scratch feature/somethingnew
This statement will push my local branch feature/somethingnew to the remote named azure-scratch. Be patient as pushing to Azure is not a fast operation.
Set up (Automatic) Continuous Deployment for Staging & Development
The last step is to configure the staging & dev branches to get automatically updated when I update the code in specific branches in my GitHub repo. While this is documented in the article Continuous deployment using GIT in Azure App Service, specifically the section on Deploy files from a repository site like BitBucket, CodePlex, Dropbox, GitHub, or Mercurial, I had an issue where Azure wouldn’t show me my private repositories so I had to go a little more low-level.
To get this working I had to follow the instructions on the projectkudu wiki, specifically Project Kudu Wiki: Continuous deployment.
Kudu is the engine that does a lot of management & automation with Azure Web Apps and git deployment slots. It is also the engine behind a site that every Azure Web App has. Add
.scmbetween the name of your site and theazurewebsites.netto get to a slick dashboard of your site where you can get to the console, see your files, view environment variables and process and many other things. For instance my site ishttps://aciorchardcmsprod.scm.azurewebsites.net. Each slot has one, so I have another forhttps://aciorchardcmsprod-dev.scm.azurewebsites.net. You can use this to also see a streaming log service or the logs generated by OrchardCMS.
Back to my configuration of the staging & dev slots. I went to the Azure ARM Explorer at https://resources.azure.com and navigated down to my staging slot’s source control configuration. The instructions on the kudu wiki page on continuous deployment tell you what to do as you set the page to edit mode and put the URL of your GitHub repo and the name of the branch in there, then click the put button to save your changes. When you do this, here’s what happens behind the scenes:
- Azure saves this configuration
- Azure reaches out to GitHub and adds a deployment key to your private repo’s settings (you can see this in your repo if you select Settings » Deploy Keys.
- Azure registers a webhook in the GitHub private repo that tells GitHub to notify Azure whenever there are push events on this repo
Here’s what mine looks like pointing to my private repo:
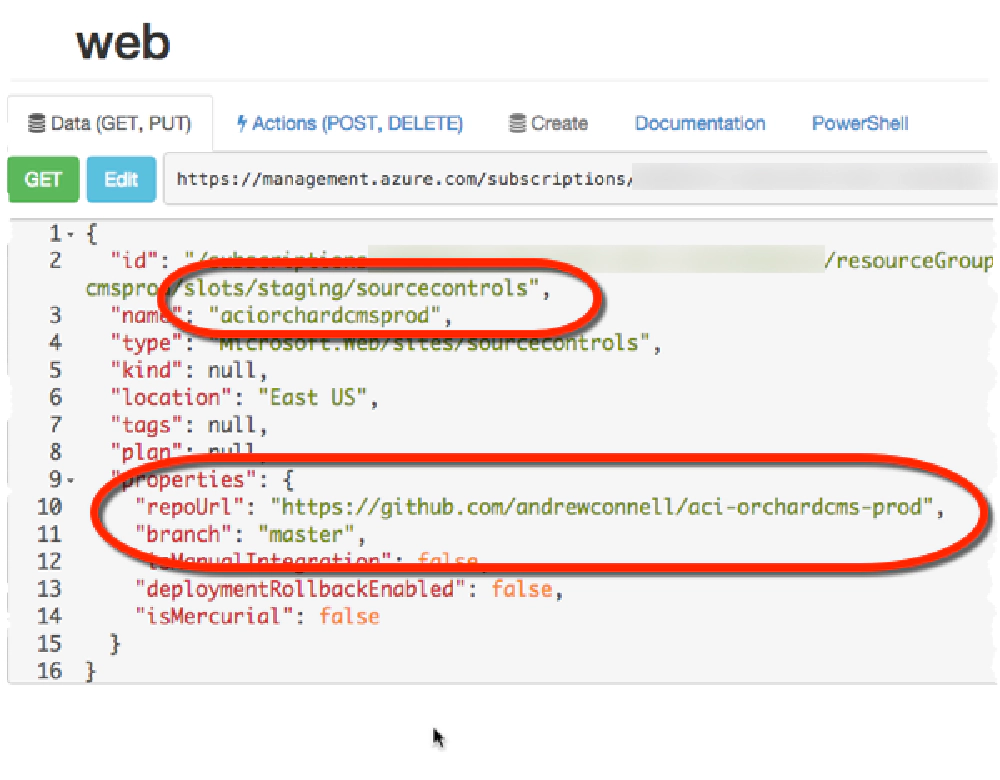
Orchard Staging ARM Explorer
The I did the same thing to the dev slot except point it to the development branch in my repo.
That’s it! Next time I push to this repo, it will tell Azure what just happened. Azure will then do a pull against the branch that got updated and the respective slot will get updated. It takes anywhere from 15s - 120s in my experience for all the events to fire and for Azure to complete the pull, build, prep and set the deployment to active, but you can watch it happen within the Azure portal. Here’s what my history looks like:
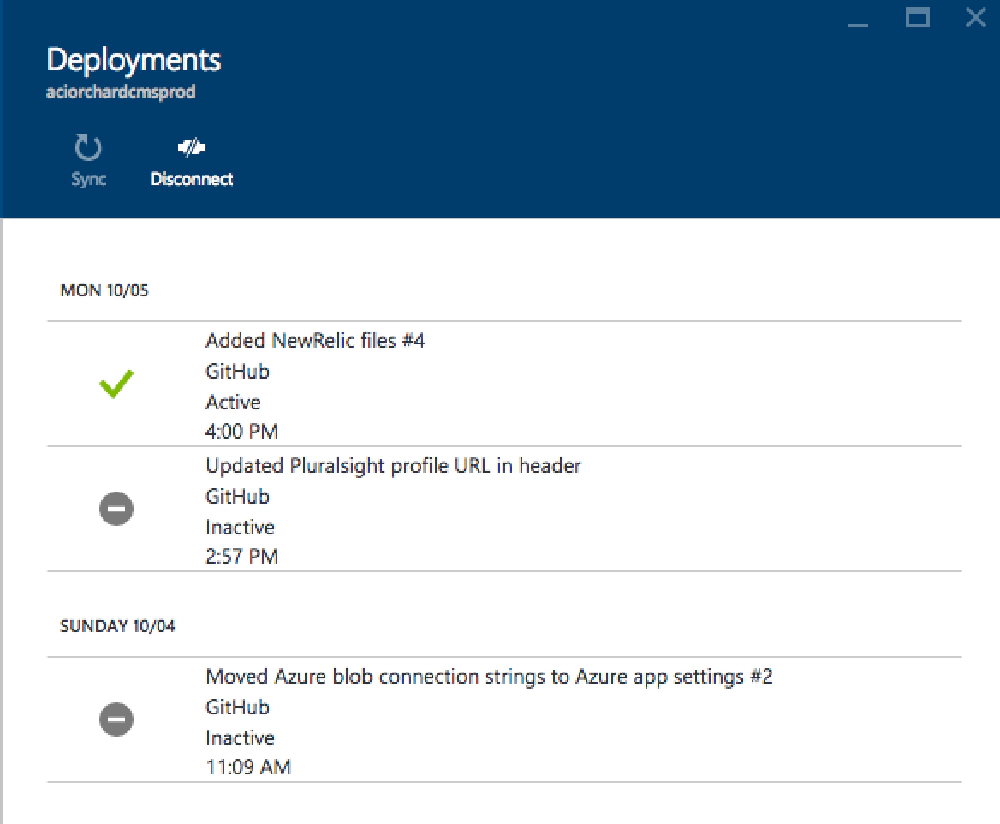
Orchard Deployment
The comment you see is the comment of the last git commit in the branch.
If I want to force an update without having to push, I can just push the sync button to instruct Azure to do a git pull without being triggered by GitHub. I can also jump back to a previous deployment by clicking the gray circle indicating it’s an inactive deployment… a great way to jump back!
Want to see a deployment & swap in action? Here’s what happened when I updated my site from OrchardCMS v1.8.2 => v1.9.1.
Set up Local Development
Last piece I wanted to set up was a local development environment within Windows so I could do local dev. I didn’t do anything special here… I used the instructions in the section Testing Multi-Tenancy on a Local Machine from the OrchardCMS docs Setting Up a Multi-Tenant Orchard Site.