I’m not thrilled with this post title, but it does say what I’m trying to convey in this post. In a recent post I explained where I was and what I was trying to achieve. Ultimately my goal was the following (stolen from my previous post):
I wanted to easily get the most recent changes from the master Orchard source tree. I then wanted to easily make edits and changes to that tree but keep them separate but I also wanted to easily make contributions to the Orchard project and submit changes as a Git pull request. Further, when there were updates to the Orchard source, I wanted to (on my schedule) merge those changes into my custom implementations so my local implementations were always on the most current release, but I didn’t want the process to be tedious or have any repetitive work such as having to re-apply my code changes. Finally, I wanted to be able to have this handle multiple Orchard deployments without having to duplicate the work across all of them.
This post is going to walk through the process that I’ve set up. Its part for others who are trying to do the same thing, but it is also for me as I needed this for my own stuff as well.
Reviewing My Current State
I am trying to make it so I have a low-pain way of:
- contributing to the Orchard CMS open source project
- adding my own customizations to Orchard for different projects / customers
- easily applying the latest code changes from the main Orchard CMS repository to my customizations
- automate the deployment of production updates
- keep everything in source control
Where I started wasn’t a very maintainable position. I had downloaded a copy of the Orchard CMS source version 1.6 and added it to my Team Foundation Service (TFS) account as a new project. I then made my changes there. This is a bad idea in retrospect because merging changes from the “blessed” Orchard source repository in CodePlex was going to be a nightmare. So I had to roll back & start over (this wasn’t so bad as I hadn’t made many changes aside from adding a few modules, themes and a minor code update.
High-Level Process
First let me explain how I’m trying to achieve and where I’m trying to get to. I am first going to get a local copy of the Orchard “blessed” source repository in CodePlex (orchard.codeplex.com)… this will be done using a simple Git clone operation. From there I’ll create branches for my customizations, either those I plan to implement as contributions to the Orchard project or those for my own deployments of Orchard. For instance, I’ll have a branch called accom.dev that I will use for my local development.
The Orchard CMS team does major releases and uses the typical [major].[minor].[revision] versioning scheme, the last few versions being 1.6, 1.6.1, 1.7 and 1.7.1. To keep my changes in sync, I am going to add the fourth position, typically implemented as the build number, as my release. So while my site is currently running Orchard CMS version 1.7.1, my actual release is 1.7.1.1. If I make any customizations, like updates to my theme, the next one will be 1.7.1.2. See the following figure for reference:
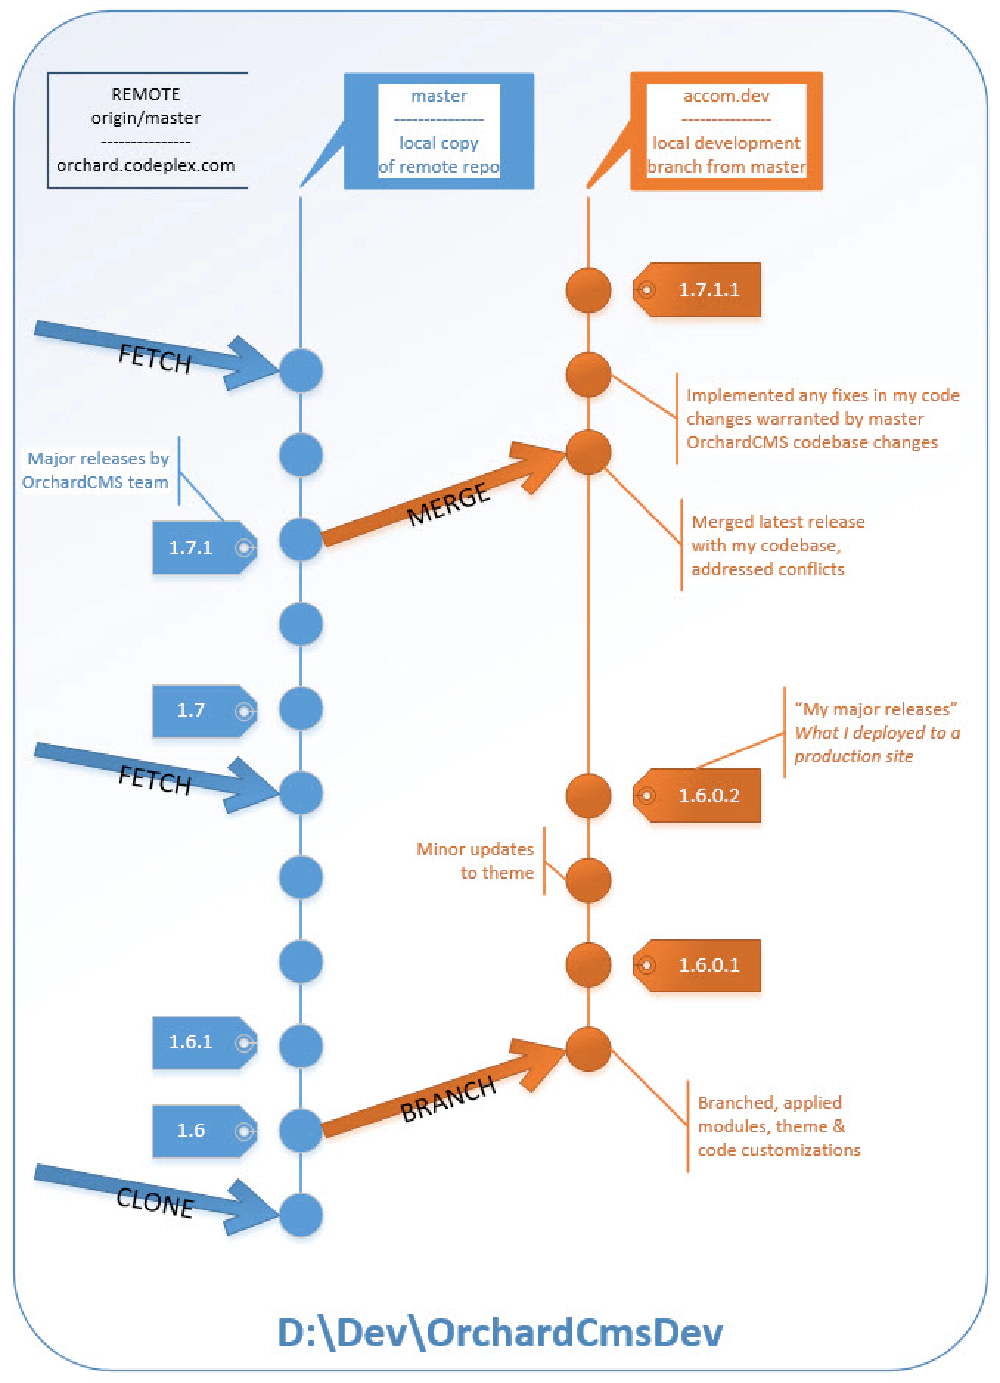
Figure 1
This works for development, but not for production. While Azure Web Sites (what I use for hosting my Orchard instances) supports git based deployments, because I’m using a full source enlistment of Orchard, it isn’t a simple process to deploy my changes. The reason being is that I only want to push a specific folder (the Orchard website project) to production, not the whole source enlistment. Because the website is in a subfolder, it presents some challenges. So for now, I have created another local repository which is cloned from the azure git deployment repository for my Azure website.
The downside to this option is that I have to manually copy the changes from my dev repository to my local pseudo-production repository, but typically this typically isn’t a lot of files that get changed with each deployment, even with a major Orchard release (and if that does happen, it’s rare… like just a few times in a calendar year at the upper end). What this gives me is a nice local pseudo-production view of how the site will look using the production database before I push the changes to the official Azure git deployment repository, saving me from having to do the one-by-one file deployment over FTP. See the following figure for reference:
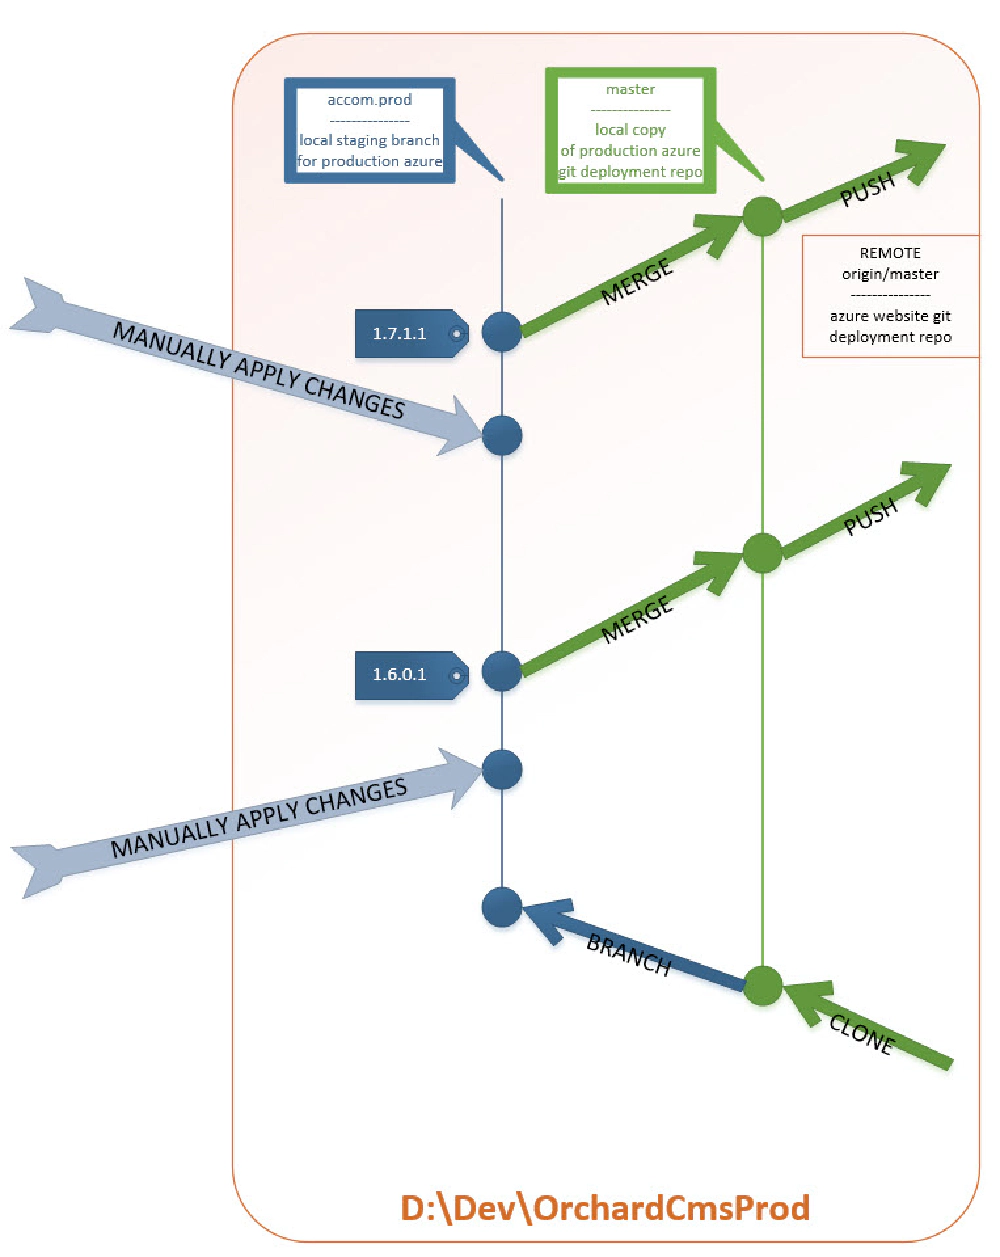
Figure 2
Enough of the high level banter… let’s dive in!
Development: Setting Up a Local Source Enlistment
The first step is to get a local copy of the official “blessed” Orchard repository. When I say “blessed” I’m talking about the one everyone applies the changes to. You can read up on the different branches on the Orchard project site (Developer FAQ / What are the Master and 1.x Branches). Getting a local copy is documented well on the Orchard site as well (Setting Up a Source Enlistment), but here’s how I did it:
First, make sure you have GitExtensions installed. I then went into my D:\Dev folder and form the context menu selected GitEx Clone and used the following settings to clone the blessed repository:
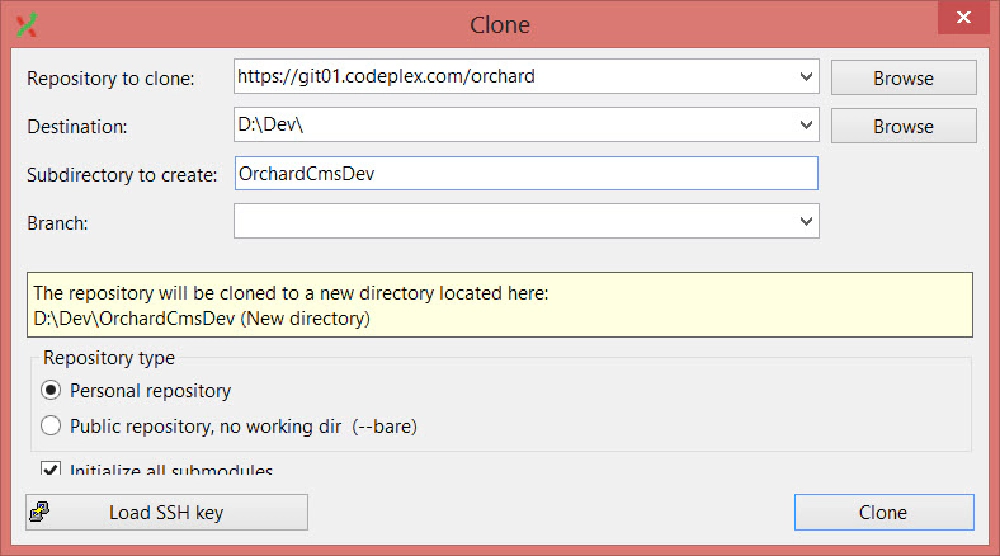
Figure 3
If I go into D:\Dev\OrchardCmsDev and select GitEx Browse you can see the repo:
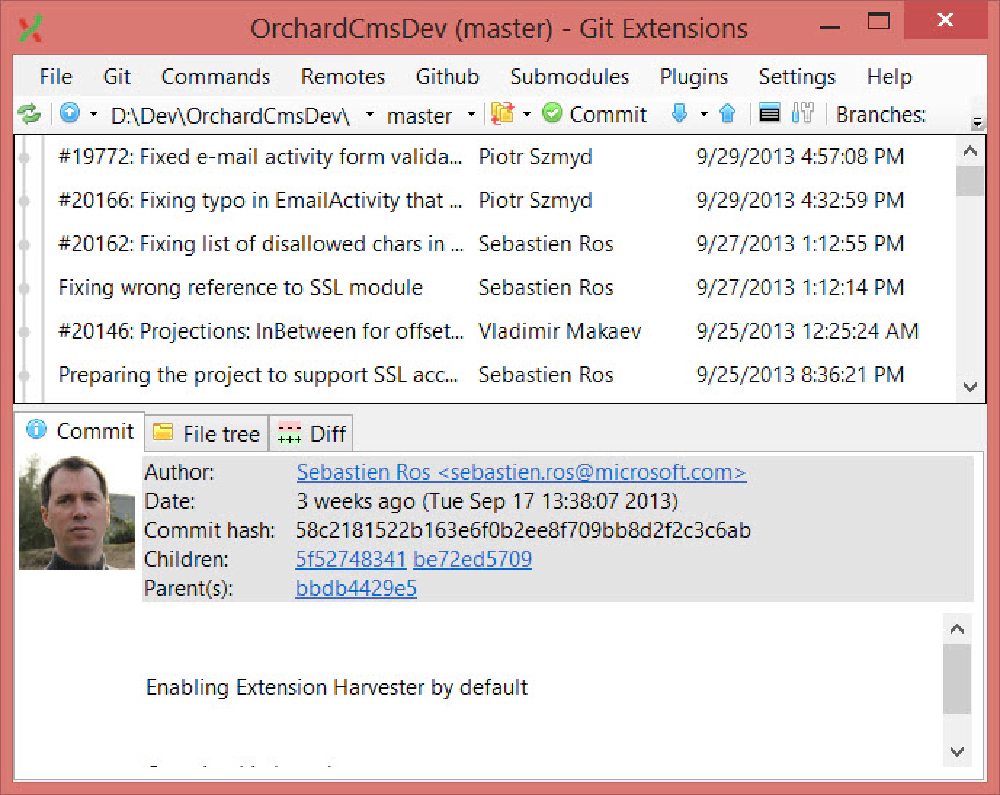
Figure 4
Set up Baseline Development Commit
Now, referring back to Figure 1 above, I need to create a local development branch where I can do my work. Because my site was originally based on Orchard 1.6, I need to find the commit that’s tagged 1.6. Here’s the official changeset in CodePlex (SHA 7f8a82c9f15a2a5747d64fab00b568b16a150070)… find that within the GitExtensions browser and select Create new branch.
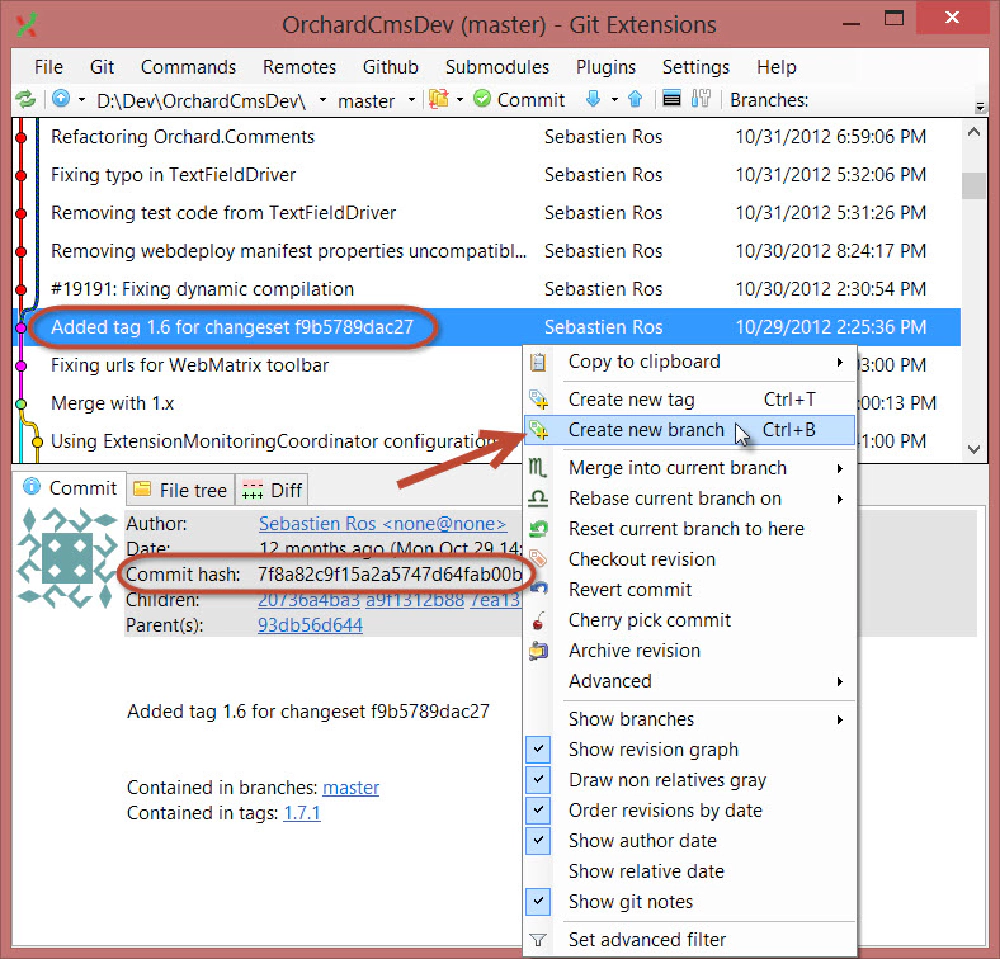
Figure 5
Now notice in the toolbar at the top you are now in the branch accom.dev.
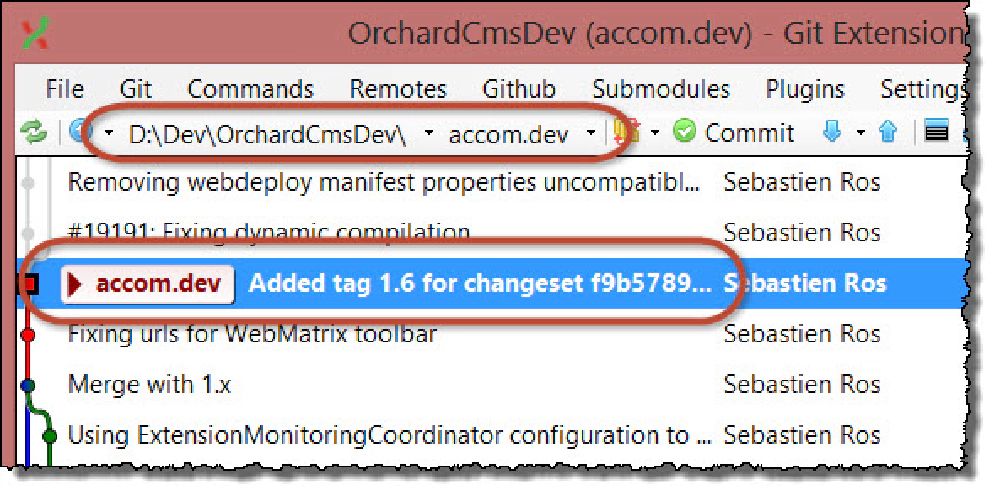
Figure 6
Add Customizations
At this point I am now able to make my necessary changes to the source that I originally made before deploying my site. This included adding the five (5) Orchard modules I listed in this blog post, my custom theme, and customizations to the Azure project listed in this discussion thread (note, these last changes are no longer needed because of improvements in the 1.7.* release). There were two modules that I needed to do a little fixup stuff to:
- Orchard.Disqus – I originally had downloaded the entire source for this module, which meant it was in a git repository. I didn’t want this to be treated as a git submodule so I removed the hidden
.gitfolder and.gitignorefile in the root of this project. - Vandelay.Industrties - I had to fix this one because it had an incorrect reference to the ICSharpZipLib reference, so I added that project manually to the
/libfolder, added it to my accom.dev branch, and updated the module’s project reference to point to the correct location of the DLL.
Once I tested everything and made sure it worked like my currently deployed site worked, I committed the changes and tagged the commit with the tag 1.6.0.1 to indicate it was Orchard version 1.6 but it was my first release.
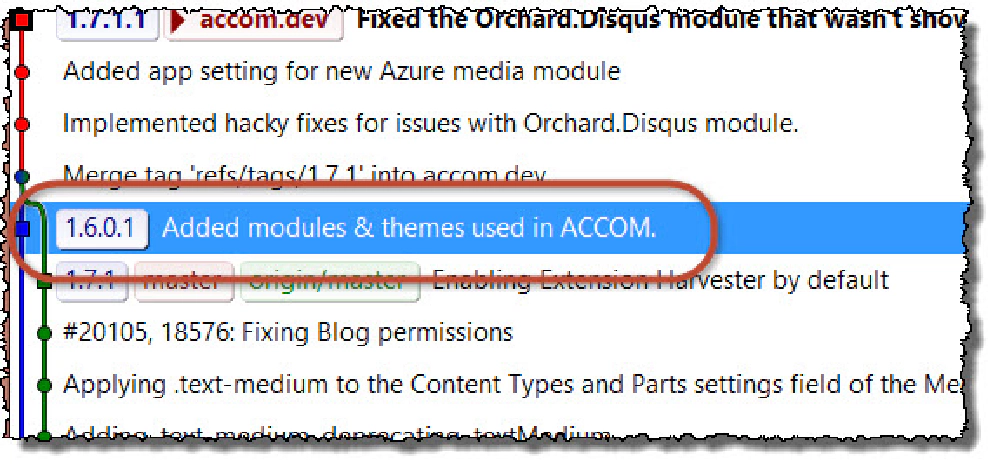
Figure 7
Update Local Dev with Current Production Release
Next up, it was time to update my development branch accom.dev to the most current Orchard release: 1.7.1. So first, I found the changeset that had the 1.7.1 tag (SHA 58c2181522b163e6f0b2ee8f709bb8d2f2c3c6ab). I then switched over to the git bash prompt (within GitExtensions, select Git > Git bash) and ran the following merge command (I didn’t see how to do this within the GitExtensions GUI):
git merge refs/tags/1.7.1
This took everything from the 1.7.1 tag in the master branch and merged it into my accom.dev branch. When there were conflicts, I yielded to the remote change… this was most common within the Orchard.sln because I added custom modules to the solution. Some modules had been replaced in the standard distro (like Contrib.Cache was absorbed as Orchard.OutputCache) so I had to make sure the Contrib.Cache module was removed from Orchard.sln.
Again, compile and test. This resulted in a few issues.
Orchard.Disqus– Damn this module is giving me fits! The Orchard.Comments module was the subject of a major overhaul from 1.6 to 1.7.* and thus wouldn’t compile. Thankfully Sebastien Ros fixed the build problem, which I implemented in my own local copy of the module. While that got the project to compile it still had issues. Another guy, Kanwartej Basrai, fixed the issue where the Disqus JavaScript wasn’t being added to the page, the same comment form and list from Orchard.Comments was being used, so I did the same code update on mine.
Azure- The new Orchard.Azure module contained a ton of new things in 1.7.1. One of which is a new module Windows Azure Blob Storage that does what I had to manually customize the code to do before: look for and store all media files in an Azure Storage Blob, not in the local
/Mediafolder. What I had to do was add a new entry in myweb.configfor an app setting to tell the module where my blob storage account was. I also use a custom domain name for my images/downloads so I added that as a prefix like this:<add key="Default:Orchard.Azure.Media.StorageConnectionString" value="BlobEndpoint=http://assets.andrewconnell.com; DefaultEndpointsProtocol=http; AccountName=aciassets; AccountKey=…"> </add>Note the
BlobEndpointkeyword is used for the custom domain to use in the fully qualified linksNote the
Default:part in the key is to qualify the specific tenant should use this storage account as OrchardCMS is a multitenant engine that can host multiple sites
Now everything was working exactly as I wanted! I then committed my changes and tagged the commit as 1.7.1.1.
Production: Publishing Updates
I could stop right here and just build the Orchard project using the ClickToBuild.cmd batch file included in the root of the source, then take the resulting built project and simply upload it to my Azure web site. However that approach means I’d have 260MB I’d have to upload and, to be exact about it, I’d need to keep track of deleted files and delete those manually. I personally didn’t want that. I wanted a better solution, one that gives me:
- A way to have a local copy of production whenever I want it that I can run easily
- A way to update my local copy to verify everything is working as it should when I upload the code changes
- And most importantly, an automated way that only updates production with the necessary changes
Windows Azure Web Sites gives you the ability to publish from source control. In my case, a local git repository will work perfectly. Within the dashboard for your Azure Web Site, click on the option to Set up deployment from source control.
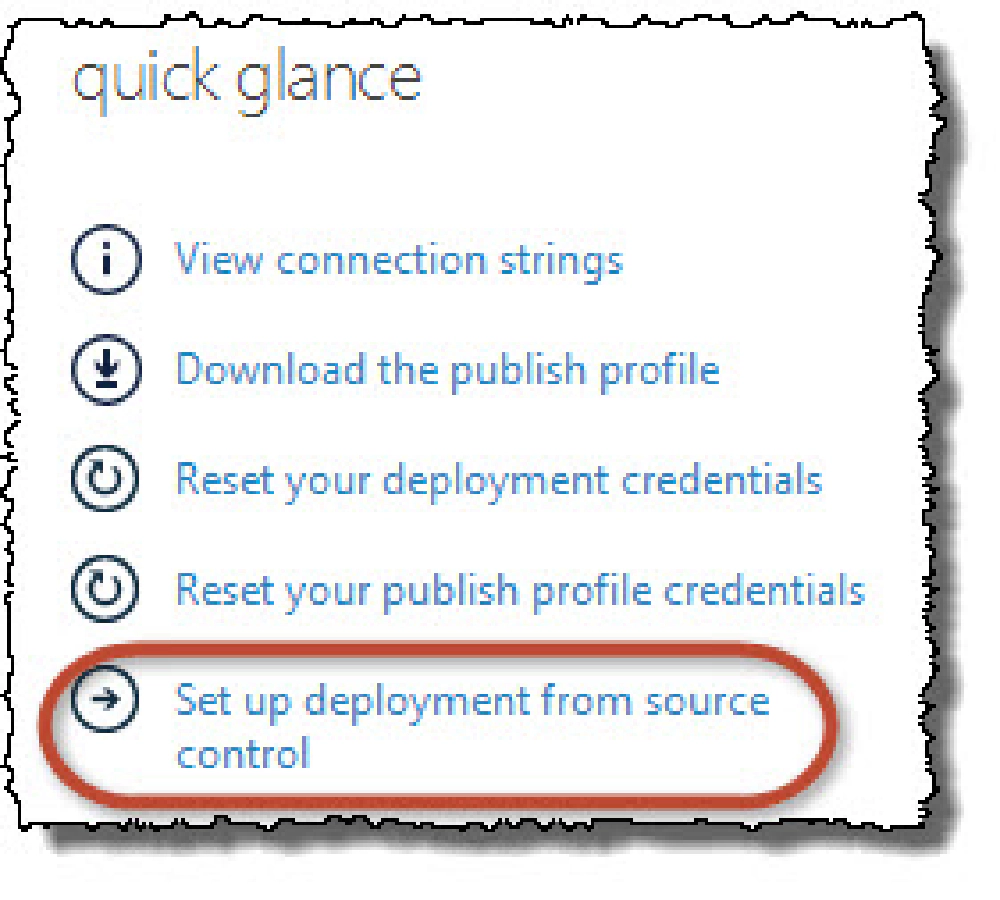
Figure 8
From there you can create a local git repository. Once I did that, I then cloned the repository using the details provided on the Azure portal once the repository was created to get a local copy of the repo. Referring to Figure 2 above, I then created a branch off the only commit named accom.prod.
Address Azure’s Dynamic Compilation
There is one little extra thing you need to do. You need to include an extra directive file at the root of the Orchard website that is not included in the source enlistment. If you don’t do this, you’ll get an error that looks like the following screenshot from my Azure portal when you try to deploy everything:

Figure 12
The error in the log will say something like “Unable to determine which project file to build.” The problem is that Azure doesn’t know which project file (*.csproj for instance) to compile because the source code enlistment is set up for dynamic compilation. To tell Azure which it is, create a .deployment file in the root of your Azure website with the following contents:
[config]
project = .`
Apply All Site Updates
Now you just copy the files you want to put into production, test locally to make sure everything looks good and then commit the changes to accom.prod. After committing the changes, I tag the commit with the version of the site (1.7.1.1). This leaves me just with an updated local accom.prod branch. The master branch is what should be a mirror of what’s in the Azure Web Site. As such, I need to merge my changes into master, so I switched back over to master using branch picker in the toolbar in GitExtensions:

Figure 9
And now, merge those changes in using GitExtentions: Commands > Merge Branches. I then merged 1.7.1.1 (which was the tag on accom.prod) into master.
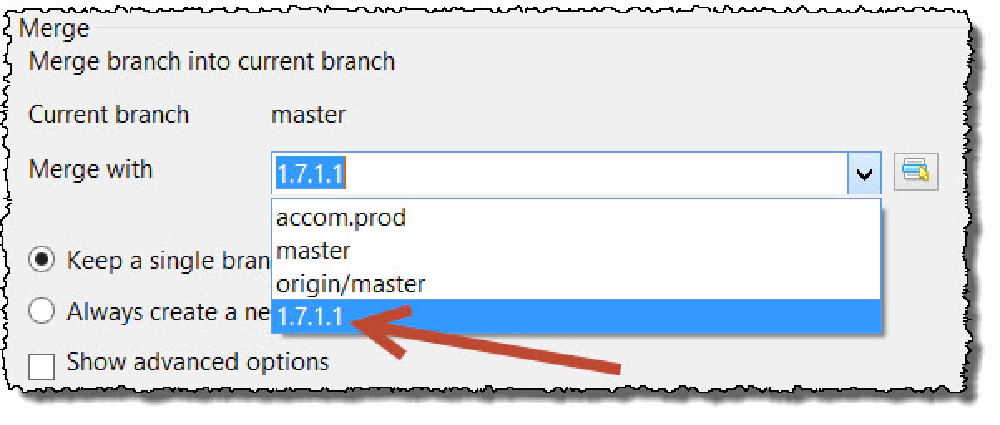
Figure 10
Update the Production Azure Web Site
Now master is out of sync with what is in the Azure Web Site which is expected. The last step is to get them in sync so I then just push the changes from master to the Azure website (which is a remote called origin) using the Commands > Push:
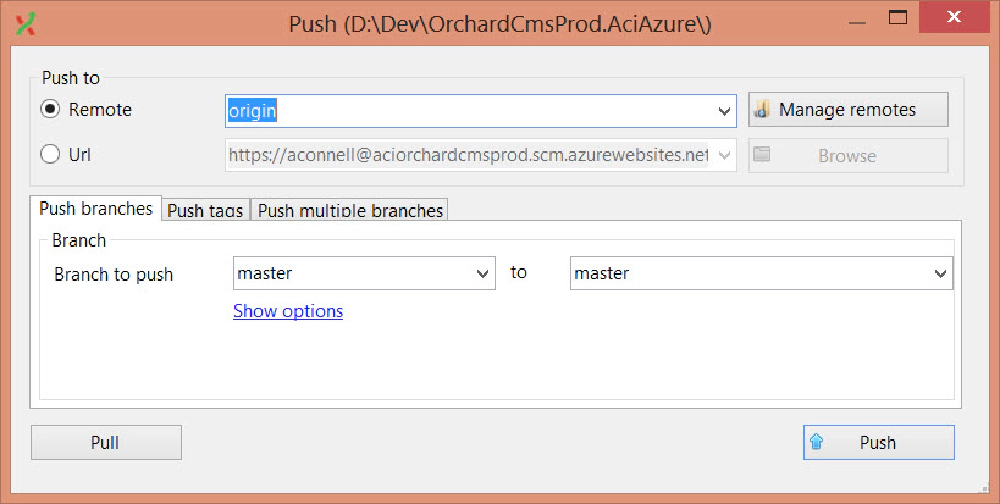
Figure 11
And that’s it! After a few seconds we should see that the Azure Website has been updated!
