TL;DR
We want our library, ngOfficeUIFabric, to be available to anyone using their preferred packaging framework. This includes npm, Bower, NuGet as well as a CDN. The process of cutting a new release & pushing to these different distribution targets is tedious and includes multiple steps. If you miss one, you can really screw up things for one of your users. I wanted to put in place a process, inspired by the Angular Material project, that was as automated as possible.
How automated is it? All we have to do is bump the version number + update the change log in the master branch. Once I push it to the main ngOfficeIUFabric repo on GitHub the deployment to all four of the package distribution services mentioned above happens automatically. The best part: it’s fully automated & transparent so you can see how we did it… so let’s get to it…
Overview of the ngOfficeUIFabric CD Process
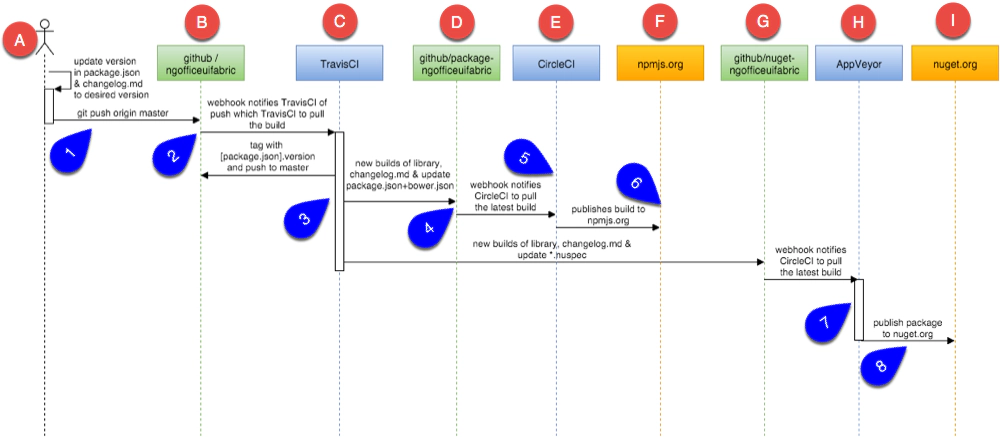
Before I jump into the weeds, let me explain the process from a high level. This sequence diagram may look complicated, but in reality is quite simple:
ngOffice UI Fabric
The orange boxes {NPMJS.org} & {NuGet.org} represent the package distribution targets we have to factor into the process with every release. Before I mentioned we also use a CDN & Bower… in the next section I’ll explain why we don’t have to concern ourselves with those two with every release.
GitHub Repo’s Supporting the Release Distributions
Our entire code hosting & distribution process is comprised of three repos in our GitHub organization ngOfficeUIFabric:
- github.com / ng-OfficeUIFabric - This is the main repository where we keep the source for the library. There are two primary branches here:
master: The master branch is an exact copy of the source that is currently released. Therefore if you are currently using our library using any of the distributions and you want to see what the code looks like for the implementation, you can go to this library and see exactly that (or jump to previous versions using the tags / releases in GitHub).dev: The dev branch is our staging… think of it as the nightly build with the most current stuff in it. Contributors submit PRs to this branch. Eventuallymasterwill be rebased on this branch to get the latest stuff.- github.com / package-ngofficeuifabric - This repo is used as the primary distribution for the library. It powers npm & Bower package managers as well as CDNJS.
- github.com / nuget-ngofficeuifabric - This repo powers the NuGet package manager distribution for the library.
Continuous Integration (CI) Services Facilitating the Release Process
At the present time we are using three different continuous integration (CI) services to handle builds, tests and release distribution. We may move to two in the future eliminating TravisCI, but that’s still undecided. For all services we’re using the free tiers for open source projects.
TravisCI - Travis is a very popular CI service. Every push to
master&devas well as all PR’s to the main source repo trigger TravisCI to run. This is primarily used to vet the builds making sure all linting checks & tests pass.You can see the status of our builds & history of builds here: https://travis-ci.org/ngOfficeUIFabric/ng-officeuifabric.
The builds are controlled by the
.travis.ymlconfig file in the root of the project: https://github.com/ngOfficeUIFabric/ng-officeuifabric/blob/master/.travis.yml. If anything fails (tests or vets), an error is logged and the build goes red.CircleCI - Circle is like Travis but is a bit more polished and reliable from my experience. We are only using it now on the package-ngofficeuifabric repo. The reason I used CircleCI here instead of TravisCI is because publishing to npm was very unreliable from Travis.
At present, all it does is simply publish to npm… seems like a waste, but it works.
You can see the status of our builds and history of builds here: https://circleci.com/gh/ngOfficeUIFabric/package-ngofficeuifabric.
The builds are controlled by the config file https://github.com/ngOfficeUIFabric/package-ngofficeuifabric/blob/master/circle.yml). In that file you see references to three environment variables which I’ve set in a password protected area of the CircleCI config for this project.
AppVeyor - The other two CI services above are Linux-based. While I tried to use JavaScript to manually create the Nuget
*.nupkgfile and upload it, NuGet kept saying the file wasn’t valid OpenXML. So I gave up and elected to use the NuGet command line client to build and push the package. The downside is that the CLI client only works on Windows today, so the existing CI services didn’t cut it.AppVeyor is a Windows-based CI/CD service and it’s hooked up to the nuget-ngofficeuifabric repo. The only purpose it has for us is to run the nuget CLI to create the NuGet package and publish it to NuGet.
You can see the status of our builds here, https://ci.appveyor.com/project/andrewconnell/nuget-ngofficeuifabric/history, all of which are controlled by this config file: https://github.com/ngOfficeUIFabric/nuget-ngofficeuifabric/blob/master/appveyor.yml.
Understanding the Package Manager / Distribution Options
As I said above, we use four package manager / distribution options to satisfy everyone. Personally I’d recommend using the CDN option for performance & the npm option as secondary if you want local copies regardless of the project you use, but we provide two more options for completeness.
CDNJS - cdnjs.com
This is a community-driven CDN. Using a CDN is preferred for performance reasons in your web application.
Getting your library into CDNJS is a piece of cake… you simply fork their repo, add your library (like we did here: 044eab7f) & submit a PR (PR#6760) and you’re in provided you meet their requirements.
Better yet, if you add a section to your package.json file, CDNJS will periodically check your GitHub repo’s tags for new versions and automatically ingest them into the CDN for you. You can read more about this process in the CDNJS docs here: autoupdate.
Once you have your library set up with CDNJS and configured for auto update, you don’t have to think about it anymore provided new versions are tagged in your GitHub repo. Therefore, you won’t see this option mentioned in the rest of this post as it’s automatic.
Bower - bower.io
Another package manager is Bower. It seems to be losing steam in popularity to npm, but it’s still very relevant. Bower has a centralized public registry that library authors can publish to. When you want to include a library from Bower in your project, Bower pulls the code straight from the library’s repo.
Therefore, once your library is added to the registry, no need to republish new versions as they will get pulled down automatically from GitHub or whatever code hoster you are using. Therefore, you won’t see this option mentioned in the rest of this post as it’s automatic.
npm
This is the defacto package manager today. To publish to it you need to have the code in a public location, which we do at package-ngofficeuifabric, and run the npm CLI… that’s it.
NuGet
This is the Microsoft defacto package manager today. To publish to it you either use the web browser or use the nuget CLI.
ngOfficeUIFabric’s CD Process In Depth
Now that covered the repos involved, the targets & services we use & why, let’s look at the process in detail. I’m going to go through the diagram in a bit more detail as it was tedious to put together trying to read the code from what other projects did, so hopefully this speeds your ramp up process.
Step 1: Create a New Version
ngOffice UI Fabric
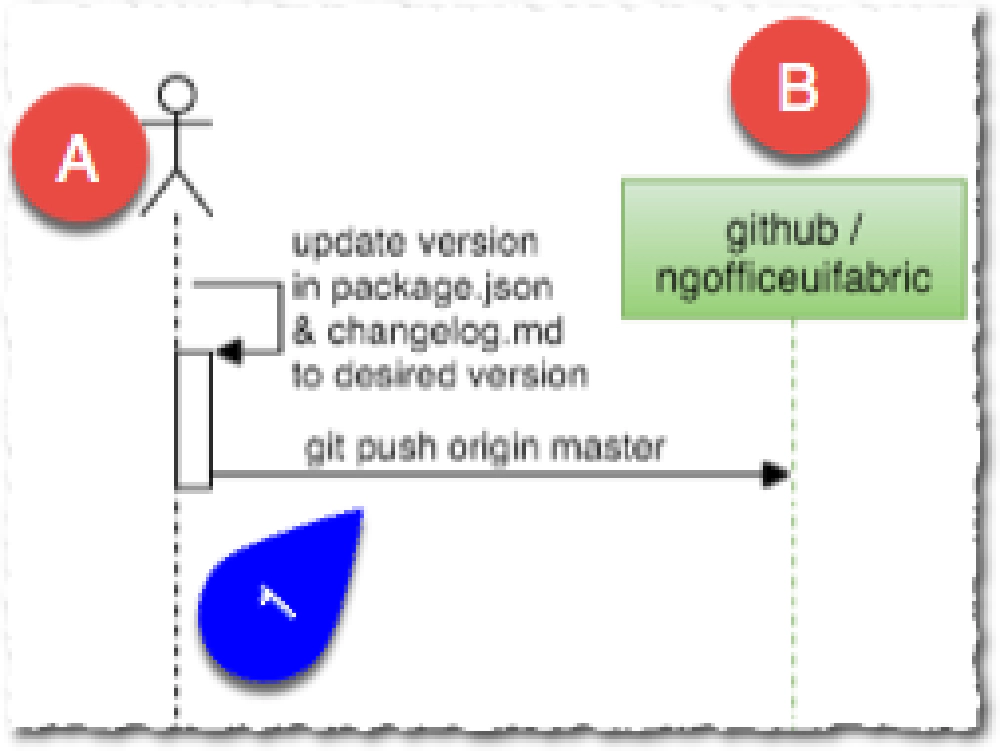
Creating a new release is the simplest part and best of all, it’s the only thing we manually do. As explained above, the master branch is what the releases look like. So, once we are ready to cut a release, we go into the dev branch and do two things:
- update
changelog.md- We update the changelog file to indicate what things are in this release. In the future we plan to automate this using our clean commit log message format that I explained in the first part of this series. - update
package.json- We also update theversionproperty to be the desired version for the new release and also update any dependencies like the version of Angular & version of Office UI Fabric we depend on, as well as an update to the list of contributors if anyone new added stuff.
Once that’s done in the dev branch, we commit the change with the commit message docs(release): #.#.# and push it to GitHub. Then we jump over to the master branch, rebase it to the tip of dev & push to GitHub (step 1 in the picture above).
# assuming on the dev branch with release changes...
# save changes to dev & commit as a new release, 0.5.1 in this example
git add -A
git commit -m "docs(release): 0.5.1"
git push origin dev
# jump to master branch & update with changes at tip of dev
git checkout master
git rebase dev
git push origin master
This push starts the entire release deployment process.
Step 2: Start Release Process & Update Main Repo
ngOffice UI Fabric
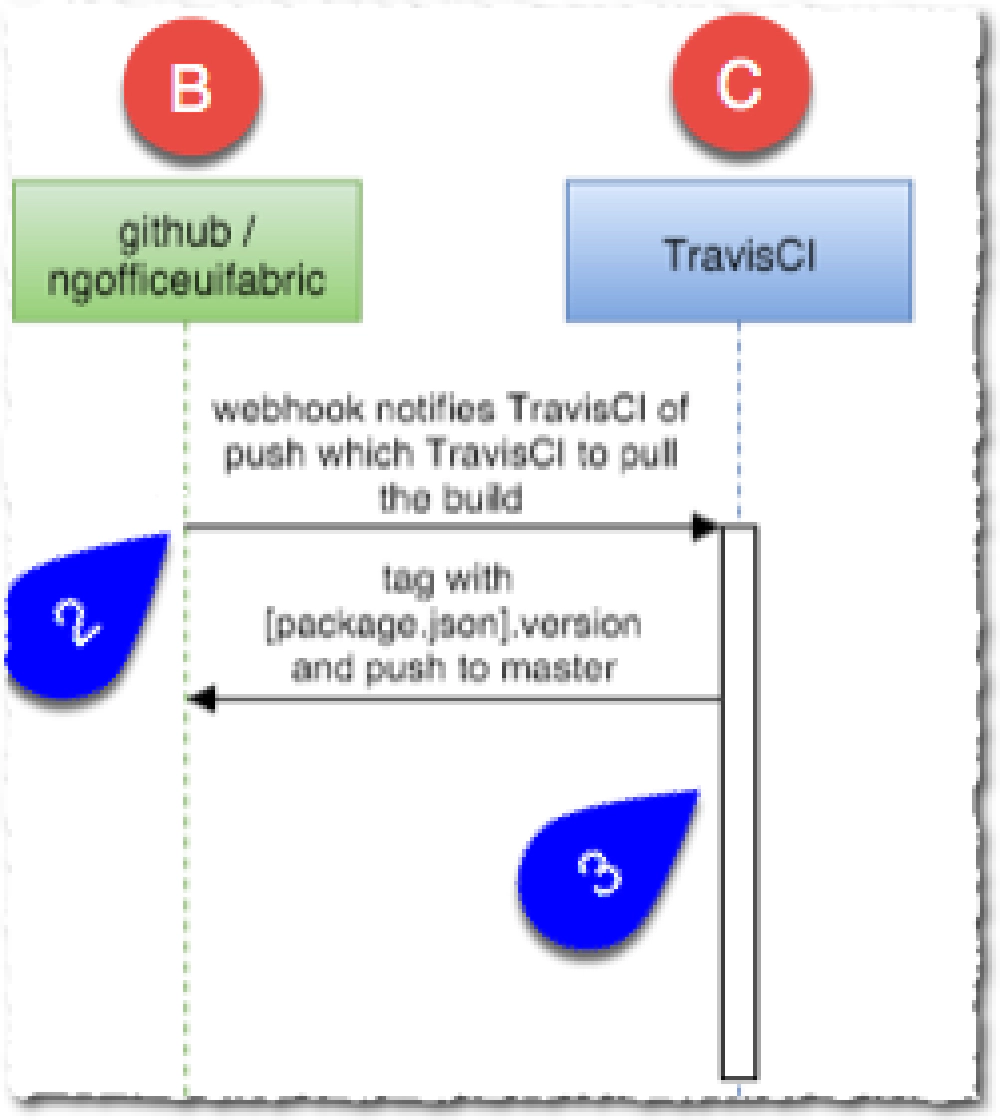
The push to master in the last step triggers a webhook (#2 in the picture above) that notifies TravisCI. This is where we kick off the automated process by running a shell script.. well… sort of…
When we are ready to start the release, from my laptop, I hope a prompt and run the following shell script from the root of the locally cloned repo’s master branch:
sh build/scripts/release.sh --git-push-dryrun=false
.travis.yml file to make this fully automated.That will run our release script which is #3 in the picture above. The script is well documented if you take a look, but let me take a minute to explain it with extra comments using this gist:
#!/bin/bash

function init {
  # if set, export --git-push-dryrun so available in other scripts
  export GIT_PUSH_DRYRUN=$GIT_PUSH_DRYRUN
}

function run {
  # jump up to the root of the repo
  cd ../..
  SRC_PATH=$PWD

  # make sure in root of repo
  if [ "${SRC_PATH##*/}" != "ng-officeuifabric" ]; then
    echo "ERROR: script must be run from the root of the 'ng-officeuifabric' repo"
    echo "ERROR: you are running from '${SRC_PATH##*/}'"
    exit 1
  fi

  echo "LOG: current folder: $SRC_PATH"


  # get version in package.json
  VERSION="$(readJsonProp "package.json" "version")"


  # get last tag
  LAST_TAG=$(git describe --tags --abbrev=0)


  # only want to proceed with a release if the version in package.json
  #   does not match the most recent tag for the repo...
  # if they do match, that indicates this is NOT a new release so we don't
  #   want to proceed... we only keep going when the two don't match...
  #   because in that case, what's in the pacakge.json is the desired version
  #   so we need to continue which will create a new tag
  if [ "$LAST_TAG" == "$VERSION" ]; then
    echo "INFO: not a new version; aborting release script"
    exit 1
  fi


  # remove previously created compiled ngOfficeUIFabric libraries
  #   this isn't necessary in Travis since it's always clean
  echo ".. pre cleaning"
  rm -Rf dist


  # compile production & debug library
  # this will create ngOfficeUIFabric.js & ngOfficeUIFabric.min.js
  echo ".. compiling prod & debug library"
  gulp build-lib
  gulp build-lib --dev


  # update source repo
  echo ".. updating source repo ng-officeuifabric"
  cd $SRC_PATH

  # again, when this runs in travis it will have zero effect because
  #   there are no new things added...
  # the only reason this is here in case we are running this script
  #   on our laptops locally and forgot to push any commits to master
  echo ".. .. pushing origin master"
  git push -q origin master


  # tag the repo with the version in package.json
  echo ".. .. adding tag for version $VERSION & pushing orign master"
  git tag -f $VERSION
  git push --tags


  # update the package & nuget repo
  sh ./build/scripts/update-package-repo.sh --version=$VERSION --src=$SRC_PATH
  sh ./build/scripts/update-nuget-repo.sh --version=$VERSION --src=$SRC_PATH
}

source $(dirname $0)/utils.inc
As you can see this script does a few checks and then creates a new tag for the ng-officeuifabric repo. Once that’s done, it runs two other scripts: one that updates the package-ngofficeuifabric repo & one that updates the nuget-ngofficeuifabric repo.
What’s with that --git-push-dryrun argument & a reference to it in the init() function? The file that’s included at the bottom of the script, uses a bit of trickery. If it detects this --git-push-dryrun argument is set to TRUE (which is also the default if omitted), it replaces the git command with it’s own that adds the --dry-run flag to all git push commands. This lets me run the entire release process without making any changes to any repos. Pretty slick eh? It’s a nice little saftey to disable the whole process.
Therefore, if you want to really run a release, you have to specify --git-push-dryrun=false to disable this.
Step 3: Update package-ngofficeuifabric & Publish to npm, Bower & CDNJS
ngOffice UI Fabric
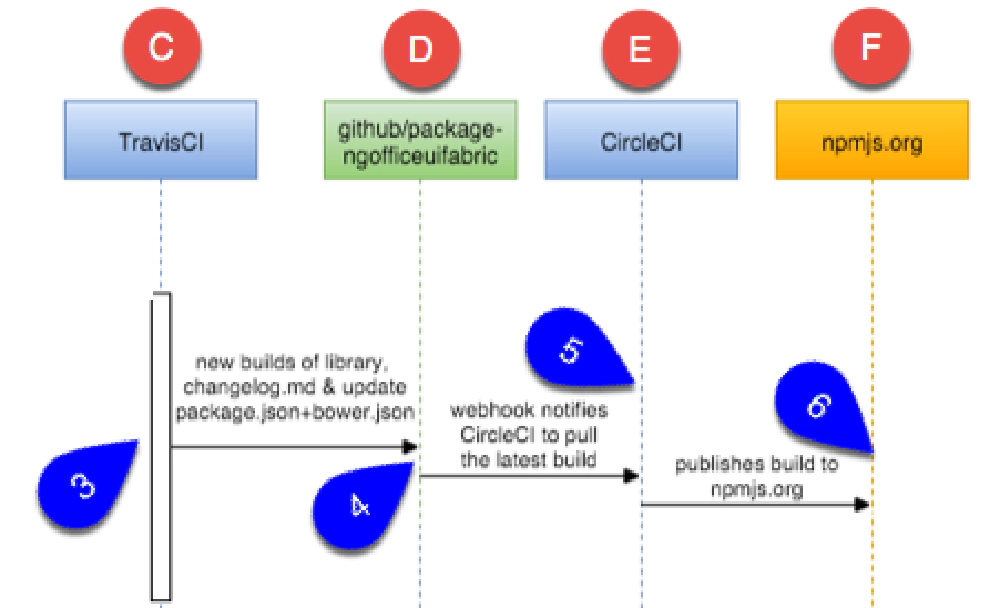
Let automation flow! We saw how #3 above was kicked off in the previous step. Recall that #3 involved running the script release.sh which calls update-package-repo.sh.
This script (which you can see below) first clones a fresh copy of the pacakge-ngofficeuifabric repo & copies the two compiled ngOfficeUIFabric libraries from the parent release.sh script as well as the changelog.md file into the repo, overwriting the previous versions. It then uses Node.js to execute a JavaScript file that updates the version numbers for the library and all dependencies in the package.json & bower.json files (I found it much easier to use JS to update the JSON than using a shell script).
Now that the repo has been updated to a new version, I then save all changes by running git add -A and commiting, tagging & pushing the changes to the remote package-ngofficeuifabric repo (#4 in the image above). This simple update takes care of updating the Bowser & CDNJS release targets, but we need to publish to npm, which is a manual command line task.
The package-ngofficeuifabric is hooked up to CircleCI which will do the publish to npm once the master branch is updated in GitHub. That just happened so taht will trigger a webhook to notify CircleCI (#5 above) which, using the circle.yml file here, will publish the repo to npm.
Check it out:
#!/bin/bash

ARG_DEFS=(
  "--version=(.*)"
  "--src=(.*)"
)

function init {
  # set up paths
  SRC_PATH=$SRC
  PKG_PATH="$(mktemp -d)"
  # set up globals
  REPO_URL="https://github.com/ngOfficeUIFabric/package-ngofficeuifabric"
}

function run {
  # start from root ng-officeuifabric library
  cd $SRC_PATH


  # clone packaging repo
  echo ".. [1 / 5] clone packaging repo"
  git clone $REPO_URL $PKG_PATH --depth=2


  # copy built library & changelog
  echo ".. [2 / 5] copying built library & changelog"
  cp -Rf dist/*.js $PKG_PATH
  cp -Rf changelog.md $PKG_PATH/changelog.md


  # update versions & dependencies in ng-office-ui-fabric.nuspec
  echo ".. [3 / 5] updating versions & dependencies in package.json & bower.json"
  node ./build/scripts/update-package-versions.js --src=$PWD --pkg=$PKG_PATH


  # update packaging repo
  echo ".. [4 / 5] updating packaging repo package-ngofficeuifabric"
  cd $PKG_PATH

  echo ".. .. adding & commiting changes to package repo"
  git add -A

  git commit -m "release(): $VERSION"
  echo ".. .. pushing origin master"
  git push -q origin master

  echo ".. .. adding tag for version $VERSION & pushing orign master"
  git tag -f $VERSION
  echo ".. .. pushing origin master tags"
  git push --tags


  # remove temp folder
  echo ".. [5 / 5] removing temp folder at:"
  echo ".. .. $PKG_PATH"
  cd $SRC_PATH
  rm -rf $PKG_PATH
}

source $(dirname $0)/utils.inc
Step 4: Update nuget-ngofficeuifabric & Publish to NuGet
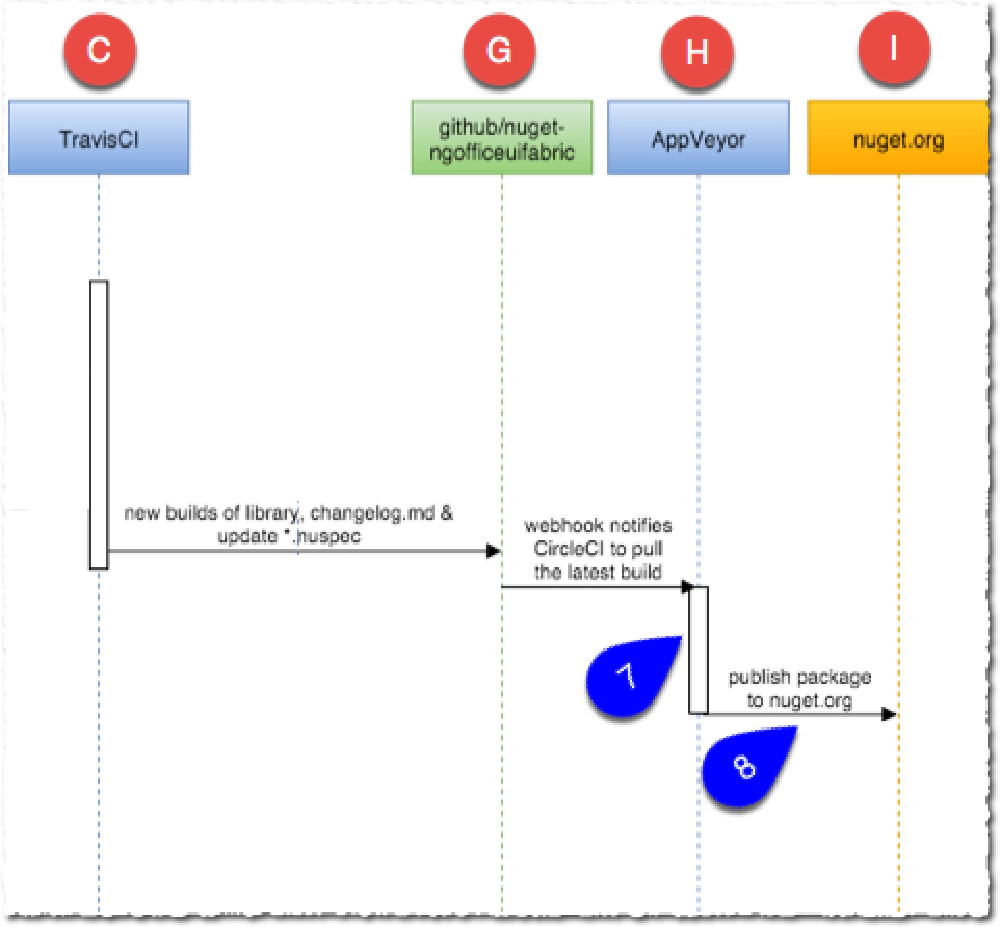
ngOffice UI Fabric
Last step, update NuGet. Again, from step 3 above, the release.sh script ran two scripts. One updated the package-ngofficeuifabric repo as explained in step 4. The other, update-nuget-repo.sh does the same thing, but for the nuget-ngofficeuifabric repo. The code is mostly the same, the difference is that we have to update an XML file with the new versions.
Just like in step 4, once that’s done the changes to the locally cloned repo are saved, tagged and pushed to GitHub. The repo is hooked up to AppVeyor which is used to build a new NuGet package using the nuget CLI (#7 in the image above) and publish it to the public NuGet registry. That’s controlled by the appveyor.yml file here.
Closing
And that’s it! Usually within a few minutes of starting the release process we have new releases published to npm, Bower & NuGet. CDNJS will pickup the changes from the new tag in the package-ngofficeuifabric repo within an hour when they run their scan.
The goal here was to make things as automated as possible. Today I am using one manual command to start the publishing process.
Looking Forward
This is how we do releases today, and it works great. There are a few things we are looking to do to extend this process. Here’s what’s on my backlog, in order of priority:
- Standardize on CircleCI: I much prefer their interface to TravisCI and they seem a bit more reliable. We already have to use two CI/CD tools in CircleCI & AppVeyor so I’d like to remove Travis from the equation. That requires a bit more testing on my fork before I do that.
- Fully Automate the Release: I’m waiting to move to CircleCI (unless I realize that Travis is better for us) before adding one more step when we push to
masteron ng-officeuifabric. This step will kick off the release automatically when we update master… but I don’t want to do this in Travis only to have to reapply to CircleCI. - Automatic Changelog Creation: Today we manually update it, but it can automated. That’s on my list of things to do using the conventional-changelog.
- Automatic Demo Site Creation: Lots of work to do here, but there’s no reason each release can’t trigger the update of our demo site. Got some slick goals & ideas here so once I get this done, I’ll write about it.
- Automatic Documentation Creation: Same as the last one… lots of ideas & goals, but more work and research required. I’ll write about it when it’s done.