Now for one of the coolest capabilities in Silverlight 4 that is only a close second to the rich data binding we have in Silverlight. We’ve all worked with event handlers before in Windows Forms, ASP.NET, Silverlight pre-v4 or other such applications. You know, you specify what the event handler method name is that is tied to by wiring up the Click event of a button. That method’s signature must match the button’s click event signature.
This approach becomes challenging on multiple levels:
- First it’s hard to test because the event receives some sort of context from the control firing the event (usually in the form of the second parameter passed into the method such as the arguments).
- Second, it’s tightly coupled to the user interface (and back to #1, it’s hard to test).
- Third, if you want to enable/disable the button, you have to have some special Boolean property you can bind the “IsEnabled” property or you have to manually disable the button.
- Finally, it’s not a very reusable way to deal with events.
Enter the command infrastructure. Let me explain it by looking at an example: take Microsoft Word . There’s a command called Paste. When you open Word for the first time the paste button in the ribbon is disabled. Why? Because there’s nothing on the clipboard so there’s nothing to paste. When something is on the clipboard the button is enabled. But there are multiple ways to use paste. You can use the button in the ribbon, maybe a button in the Quick Access Toolbar above the ribbon, maybe using the right-click context menu or even CTRL + V . They should all do and act the same way… enabled when available, disabled when unavailable. They all do the exact same thing… in other words, they all use the exact same command.
Commands are actually very simple. What you do is create a new object that implements the ICommand interface. This interface defines a few things. First you specify what to do when you run the command (ICommand.Execture()). Second you specify a method (ICommand.CanExecute())that has a Boolean return type that say when the command is available. What’s nice about this is that the command infrastructure automatically sets the enabled property on the user control when the command’s availability changes. The last part is an event that you can use to notify the command infrastructure the CanExecute() should be called again.
After creating the command you simply bind it to the control’s command property like so:

Binding a comment to control's command property
This binds the command object LaunchSettingsDialogCommand to the button. Notice the IsEnabled property isn’t set… that’s because the command infrastructure handles it for us. That simplifies one thing for us.
Another thing that is simplified is the Execute() method on the command takes zero input parameters making it super easy to test. If the command needs any context it can obtain it from the view model where the command object is defined as a property. Since the view is just a UI for the view model, there’s no need for the view and thus you can fully automate the testing infrastructure.
The other big takeaway is the reuse. As the Word Paste example above, you can use a command in multiple places.
How does the MVVM Light Toolkit help?
Great question! Building a command the organic way means you have to create an object for each command that implements the ICommand interface. Then you’ll create a public property you can bind to that’s the type of the command you created. This is a bit of extra code. But all you really need are two parts (one being optional):
- Code to run when the command is executed.
- Code to return a Boolean value to determine if the command is or isn’t available. If not specified, it’s always true.
Enter the RelayCommand! This dramatically simplifies things. There’s no special object to create, just pass in two delegates to represent the two requirements above.

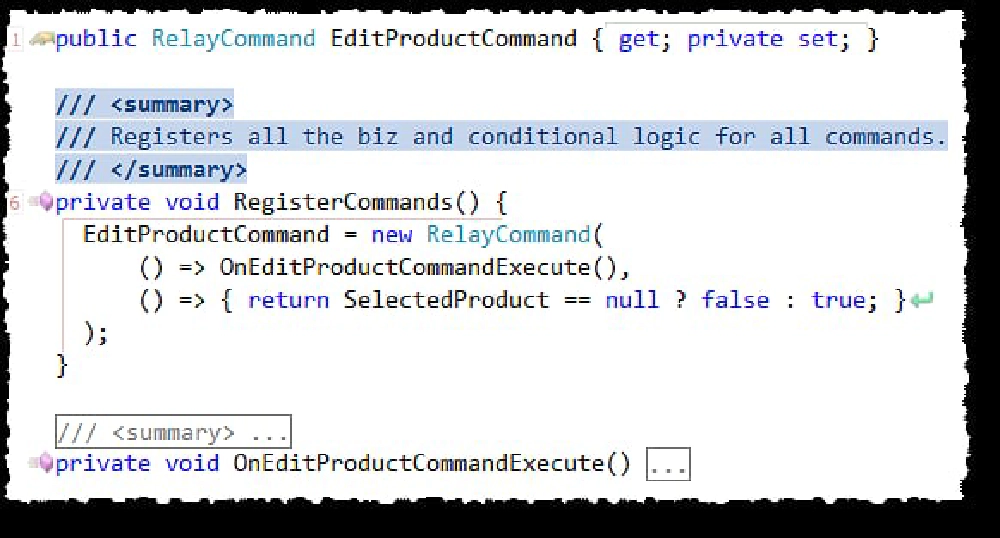
RelayCommand
In this sample you can see the public object that I bind to is called EditProductCommand. In the constructor of my view model I call RegisterCommands(). It creates the command instance by passing in two delegates. The first one is a pointer to the method to run (which could have been inline code but it was a bit unreadable… at least that’s an option) when the action is called and the second one determines if the command is available. In this case the command is available when the SelectedProduct is not null.
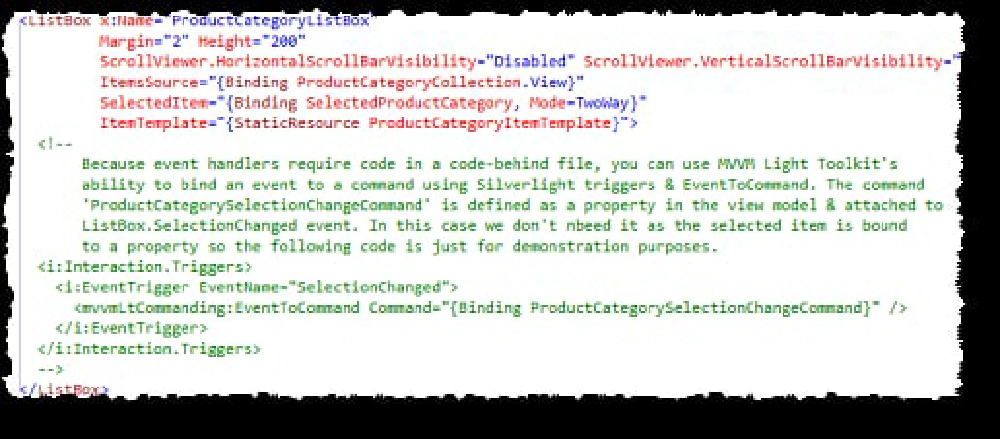
Now, another little trick when the toolkit comes in handy is when you want to bind a command to an object, but it doesn’t support commands it only has the old school events. In this case you could create a custom behavior as I show here in this old post, or you could use the EventToCommand behavior in the toolkit to wire it up. I have it commented out because I don’t need it here, but you can get the picture:

EventToCommand
Pretty cool huh?